Home | It's Just Text Files, People
The multi-touch capacitive touch interface is so inherently crucial to the entire iPhone, iPad, and Apple Watch experience that it was one of the key parts of the keynote.

Fast-forward nearly 20 years and SwiftUI is the preferred way to build interfaces on iOS devices but, despite being nearly 7 years old, we are not to a point where we can accomplish the same level of capability that was released in iPhoneOS 3.2 way back in 2010.
In this entry, I’ll be talking about the difference between UIKit’s UIGestureRecognizer and concrete subclasses, SwiftUI’s Gesture, and the bridge between with UIGestureRecognizerRepresentable. At the end, I’ll introduce a Swift Package Manager library and sample app that I wrote to help bridge the gap.
UIGestureRecognizer
Before iPhoneOS 3.2, developers had to manually keep track of the state of touches by utilizing the functions on UIView around touches began, moved, ended, and cancelled. As a result, Apple introduced UIGestureRecognizer with concrete subclasses for specific, common behaviors: tapping, panning, swiping, rotation, etc…. These were absolutely a godsend given the load of keeping track of state, doing associated math, and reusing the code was a nightmare.
As a high overview, the gestures follow a typical target/action pattern but also have delegation in the mix for whether to a gesture should begin, which gestures to block or interact with, and if the gesture should receive a touch. Additionally, when the action is triggered, you are passed the gesture which contains its current location as well as the state such as possible, started, changed, ended, cancelled, and failed.
As someone who has utilized the code multiple times in various ways, it is one of my favorite APIs in that it works consistently, is easy to understand, and abstracts the right amount of complexity away from the day-to-day development cycle. Plus, if you want to drop down to a more complex use-case, you can make your own UIGestureRecognizer subclass or fall back to touches began, changed, ended, or failed.
SwiftUI Gesture
As with some SwiftUI views (ScrollView comes to mind), there is definitely a subset of functionality within SwiftUI’s gestures when compared to UIKit’s.
Let’s take a look at DragGesture. It’s counterpart in UIKit is UIPanGestureRecognizer. Because DragGesture in continuous, it has a .onChanged and .onEnded modifier but even right there, we see a limitation: what about .onBegan? Additionally, velocity and the ability to set more than one touch is missing.
It is true that there is shared functionality like ability to set a gesture simultaneously and getting the touch’s location and translation within a view.
Regardless, there are gaps and this means that when converting a UIKit app to SwiftUI, you’re going to run into these.
UIGestureRecognizerRepresentable
If you were a 4 trillion dollar company, what would you do? Pour resources into making your new technology at feature parity with your old technology? How about you add a bridge!
That’s what UIGestureRecognizerRepresentable is. Just like UIViewRepresentable and UIViewControllerRepresentable, this is a bridge that allows you to interop UIKit code with SwiftUI. Just like the aforementioned representables, UIGestureRecognizerRepresentable has a few specific methods to manage the lifecycle of the UIKit gesture within a SwiftUI view:
makeUIGestureRecognizer(context:):; where you instantiate your gesture (e.g., a UIPanGestureRecognizer).updateUIGestureRecognizer(_:context:):; when the SwiftUI state changes, you need to sync properties, like number of touches, from your SwiftUI view to the UIKit gesture.Coordinator: You can optionally use a coordinator to handle delegation or other target-action events
You can read more in the docs here.
I am not going to write exactly how this is used (you’ll see why in a moment) but here is a good overview by Swift With Majid.
This is way better than what people were doing which is using UIViewRepresentable, attaching UIKit gestures to that and overlaying the representable view over a SwiftUI view.
There’s Always a Catch
When usings these bridged UIKit gestures, it is as easy as using func gesture(_ representable: some UIGestureRecognizerRepresentable) -> some View modifier but you’ll notice that the argument isn’t Gesture but UIGestureRecognizerRepresentable.
The catch is that you can’t use func simultaneousGesture<T>(_ gesture: T, including mask: GestureMask = .all) -> some View where T : Gesture because T isn’t Gesture. Same for func simultaneousGesture<T>(T, including: GestureMask) -> some View and anything else mentioned in this article about composing gestures.
You could possibly use the UIGestureRecognizerDelegate method of func gestureRecognizer(UIGestureRecognizer, shouldRecognizeSimultaneouslyWith: UIGestureRecognizer) -> Bool
but when you do, you get this unhelpful type:
<SwiftUI.UIKitResponderGestureRecognizer: 0x10560bb00; id = 95; baseClass = UIGestureRecognizer; state = Possible; delaysTouchesEnded = NO; view = <_TtCGC7SwiftUI32NavigationStackHostingControllerVS_7AnyView_P10$1dadfd8f011HostingView: 0x105605940>; target= <(action=flushActions, target=<SwiftUI.UIKitResponderEventBindingBridge 0x600000cb34b0>)>>
So, you just have to use the modifier you get and hope for the best which is not ideal but it’s better than nothing!
UIKitGesturesForSwiftUI
While I explore this at my J.O.B., I thought that perhaps there could be a library that is a wrapper for each UIGestureRecognizer subclass so that you don’t have to write all of that boilerplate yourself and so that’s what I did. You can find a Swift Package Manager package here.
I also wrote a companion app which utilizes the library that you can find here.
I’d love it if you’d check it out and, if you have any feedback, let me know on Mastodon here.
Part 5! Just as a recap: part 1, I laid out the code structure for Apple’s Async Image Loading sample code. In part 2, I fixed up the Xcode project—something you’ll need to do when starting a new project because Swift 6 and strict checking aren’t on by default (as of June 2025). Today, we’ll actually convert the dispatch and closure-based code to use Actors and async/await. In part 3 we converted the ImageCache, responsible for fetching and caching image data to an Actor in order to safely use and mutate across contexts. Part 4 featured me getting rid of the URLProtocol subclass in order to utilize the Repository Pattern in order to chose between mock and live data being vended using Structured Concurrency.
SwiftUI
Introduced in 2019, SwiftUI is the “best way to build apps for Apple platforms” according to Apple. So, let’s utilize our new, modern version of the image loading in SwiftUI.
I merged the commit into main and you can follow along here.
Implementation
Because we want the image to only load when it is on screen, we will use a LazyVGrid with five columns.
    var body: some View {
        ScrollView {
            LazyVGrid(columns: columns, spacing: 0) {
                ForEach(items) { item in
                    ItemView(item: item)
                }
            }
        }
    }
Nothing too wild here. Instead of using AsyncImage, let’s write our own ItemView that uses our ImageCacheActor.
    private struct ItemView: View {
        static let imageCacheActor: ImageCacheActor = ImageCacheActor.publicCache
        let item: Item
        @State private var image: UIImage?

        var body: some View {
            if let image {
                Image(uiImage: image)
                    .resizable()
                    .aspectRatio(1, contentMode: .fit)
            } else {
                Image(uiImage: ImageCacheActor.placeholderImage)
                    .resizable()
                    .aspectRatio(1, contentMode: .fill)
                    .scaleEffect(0.5)
                    .task {
                        do {
                            self.image = try await Self.imageCacheActor.load(imageAtURL: item.imageURL)
                        } catch {
                            self.image = UIImage(systemName: "wifi.slash")
                        }
                    }
            }
        }
    }
The code above is vastly easier to write than UIKit! Effectively, we have a static variable that all of the cells will use: our publicCache singleton. We have an Item to provide the URL for the image and then an optional @State variable to hold onto the image data if it is present.
Within the body, we check to see if that image has been loaded and, if so, use it as is. If the image is not loaded then we use our placeholder image and then use a .task modifier to fetch the image using our imageCacheActor. The .task modifier has two advantages: it allows for asynchronous code within and has built-in cancelation if the view is no longer needed.
Easy Breezy
And that’s it! In 42 lines of code, we have done something that took many lines in UIKit. Most importantly, we utlized the same mechanism for fetching the image that we used in UIKit with no modification which is a sign of a useful API.
Some improvements could be injecting the ImageCacheActor so we aren’t so tied to a particular fetching mechanism but I left it this was for the sake of simplicity.
To catch you up, in part 1, I laid out the code structure for Apple’s Async Image Loading sample code. In part 2, I fixed up the Xcode project—something you’ll need to do when starting a new project because Swift 6 and strict checking aren’t on by default (as of June 2025). Today, we’ll actually convert the dispatch and closure-based code to use Actors and async/await. In part 3 we converted the ImageCache, responsible for fetching and caching image data to an Actor in order to safely use and mutate across contexts.
Today, we are going to finish the last bit of infrastructure that will get the images for the Table/Collection Views.
Again, my code is located here.
iOS 2 was a Long Time Ago
iPhoneOS 2.0 was released on July 11, 2008 which was 17 years ago.
The mechanism that uses Apple’s sample code to bypass the network and, instead, go to the bundle is URLProtocol. What’s amazing to think about is that URLProtocol uses URLSession which came out five years later with iOS 7.0. Before that, you’d use NSURLConnection.
Needless to say, this does not support Swift Concurrency.
ImageURLProtocol
Let’s do our best to change this class that uses DispatchSerialQueue into something that can use Task. You can follow along in this commit.
In the startLoading() function, instead of creating a DispatchWorkItem, we will create a Task that we need to hold on in case we need to cancel it later in stopLoading(). Within this Task, we sleep for a random amount between 0.5 and 3.0 seconds. The rest of the code is basically the same with the only other difference being that we wrap it all in a do/catch in order to catch the errors, log them, and fail with an error.
Job done! Right? Right?
Those Damn Errors
❌ Passing closure as a 'sending' parameter risks causing data races between code in the current task and concurrent execution of the closure; this is an error in the Swift 6 language mode`
	ℹ️ Closure captures 'self' which is accessible to code in the current task
That’s right, self is not safe to send between contexts because it is neither Sendable nor isolated. If you try to make it Sendable that’s a no-no because this class inherits from URLProtocol and 'Sendable' class 'ImageURLAsyncProtocol' cannot inherit from another class other than 'NSObject'. Besides, you have a property of the Task that is not safe to mutate from various contexts.
You can’t take self out of the equation because you need to send self to all of the URLProtocolClient functions you need to call in order to signal to the client that a response was received or if you failed.
If we weren’t using self, we could pass only the actual information, after making sure it was Sendable, by only capturing what you need in an explicit capture list but, again, self is being used.
@preconcurrency to the Rescue (?)
A former me would have thought, “Well, this API is definitely before Swift Concurrency.”, let’s mark it @preconcurrency. And that’s what I did in this commit but it’s not that simple. As Matt Massicote points out, @preconcurrency “alters how definitions are interpreted by the compiler. In general, it relaxes some rules that might otherwise make a definition difficult or even impossible to use.”. Notice he said “relaxes some rules” and not “fixes the underlying issues”.
The code Apple provided has a static URLSession that it uses to make network calls. We use that to make network calls but we have no guarantee that the ImageURLAsyncProtocol will be unique despite me printing out self each time startLoading() is called and see:
<Async_Image_Loading.ImageURLAsyncProtocol: 0x600000c912c0>
<Async_Image_Loading.ImageURLAsyncProtocol: 0x600000c91380>
<Async_Image_Loading.ImageURLAsyncProtocol: 0x600000c17360>
<Async_Image_Loading.ImageURLAsyncProtocol: 0x600000c91410>
<Async_Image_Loading.ImageURLAsyncProtocol: 0x600000c91320>
<Async_Image_Loading.ImageURLAsyncProtocol: 0x600000c91200>
<Async_Image_Loading.ImageURLAsyncProtocol: 0x600000c12f10>
<Async_Image_Loading.ImageURLAsyncProtocol: 0x600000c19ec0>
But we can’t guarantee that. There is a very real chance that our class could be used multiple times to startLoading() and then self is captured in the Task and, before the request is fulfilled, another call to startLoading() is made and replaces the reference to self. Thus self does risks causing data races between code in the current task and concurrent execution of the closure.
FINE.
An Alternative
What are we really trying to do here? Apple is trying to show how to fetch data from somewhere and they build in a delay to mimic an EDGE connection. That somewhere tips me off that we might be able to do something better.
Repository Pattern
Surprisingly, there is no wiki entry on the Repository Pattern but it’s been something I’ve been using since 2011 when it was introduced to me in a code base I was hired to update.
Effectively, you provide an interface that dictates how you will provide data. You can then determine concrete functionality that will fulfill the promise of that interface in a specific way. For instance, you may want to provide your data from the network but you could also provide it from in-memory store or mock data in your bundle. Each one of those could be structures that adhere to the repository protocol but have distinct internal workings in order to provide the data.
Back to our issue at hand, we have a need to fetch images from somewhere and build in a delay.
The Interface
We will set up a protocol that gives the API of sorts to the consumer of what this provider will provide. Simply, it looks like this:
Alright, in part 1, I laid out the code structure is for Apple’s Async Image Loading sample code. In part 2, I fixed up the Xcode project—something you’ll need to do when starting a new project because Swift 6 and strict checking aren’t on by default (as of June 2025). Today, we’ll actually convert the dispatch and closure-based code to use Actors and async/await.
Just as a reminder my code is located here.
A Disclosure
Before we start, I want to reference back to Swift’s release in 2014. There was a tendency for developers with years of Objective-C experience to write Swift code using the same patterns, which often resulted in the fuzzy, subjective judgment that the code wasn’t “Swifty” enough. Something similar is happening again with Structured Concurrency. After years of writing code that explicitly manages threading and handles locks, we now have a handy tool that allows us to catch potential data races before compilation. However, as we learn this new approach, our code might initially mimic older patterns to some degree. The reason I mention this is if you squint at the old code in the exercise, you should be able to see how it translates to something more modern. The underlying patterns and structure are somewhat present, which might help you bridge from the old way of doing things to the new, even if it doesn’t fully embrace all the new paradigm has to offer.
ImageCacheActor
Let’s begin by making an Actor called ImageCacheActor.
Properties
We’ll have a singleton static variable that can be accessed from various places just like the old version.
The old version uses NSCache<NSURL, UIImage> to cache the images but is that Sendable or thread-safe? The documentation does say:
> You can add, remove, and query items in the cache from different threads without having to lock the cache yourself.
Let’s roll with it! We are making it @MainActor because we will want to access it later from the Table/CollectionView in order to determine if we even need to fetch the image. This will need to be done from the Main Actor.
The next and final property is a dictionary that used to contain a Dictionary where the key was the NSURL and the value was [(Item, UIImage?) -> Swift.Void] (Note, that’s an Array of closures). The purpose of this Dictionary is for the case the image was already loading but a newly dequeued cell requested the image again which would pass in a new completion closure. When the image is loaded, it will call the original closure but also all subsequent closures if other callers requested the same URL.
What we’ll be doing is converting that to a Dictionary where the key is still NSURL but the value will be the first task (See here). This is the first big shift in thinking because of the top-down approach of async/await. We’ll get into what that means in the implementation described down below.
Okay, the properties are out of the way so let’s get to the meat of it.
Functions
Our first function follows what we had before with a public interface for our NSCache. This works, though, because well, “You can add, remove, and query items in the cache from different threads without having to lock the cache yourself.”. If you say so! We are annotating it as @MainActor for reasoned explained above.
Load URL
The real work gets done in final func load(url: URL) async throws -> UIImage. You’ll notice that we changed the signature to take in a URL but no Item as I don’t want to tie this utilitarian functionality to a specific model object type. Also, we change the completion handler to something that is async, throws an error, and returns UIImage. Before, the function gave no indication that something went wrong, it just returned nil for the image which is better than returning the placeholder image, I guess.
Let’s get to the meat of the function!
I’m actually going to defer my explaination of the defer to the end. Moving on…
After the defer, the first step is to check the cache using the function outlined above and returned the cached image if there is one.
        // Check for a cached image.
        if let cachedImage = await image(url: url) {
            return cachedImage
        }
We need to await because we are changing contexts between our Actor and the @MainActor. Not a huge deal as NSCache is safe and our function is async anyway.
Remember that Dictionary where the key was the NSURL and the value was a Task? Time to shine loadingResponses!
        // In case there are more than one requestor for the image, we wait for the previous request and
        // return the image (or throw)
        if let previousTask = loadingResponses[url] {
            return try await previousTask.value
        }
What this code does is check for a previous request (we will discuss shortly) in a Task at that URL which is stored in a Dictionary. If we did make a request earlier, we will tell whatever subsequent caller that is loading the image at that URL to hold on for the result of that first call. This is quite the shift in thinking!
Previously, we held each request’s completion handler in an array and then iterate over each completion closure stored once the image comes back and is valid.
Next up, we make a Task<(UIImage), any Error> and save it to a local let variable.
        // Go fetch the image.
        let currentTask = Task {
            let (data, _) = try await ImageURLAsyncProtocol.urlSession().data(from: url)
            // Try to create the image. If not, throw bad image data error.
            guard let image = UIImage(data: data) else {
                throw LoadingError.badImageData
            }
            // Cache the image.
            await setCachedImage(image, atUrl: url)
            return image
        }
In the task, we asynchronously fetch the data from the URL. When that is done, we make sure it’s a valid UIImage or throw an error. If it is valid, we use a function (more on that in a second) to set the image to the cache, and, finally, return the image as the Task’s value.
This is the part of the code that lines up well with the old way of fetching URLSession data, getting a completion closure, and handling the result. In fact, it lines up so well, it’s probably doesn’t go far enough to transform the code to adjust to the new way of working which I apologized for before. Much like Apple probably looks at their original code sample and might cringe, so will I in five years.
After that Task is made, we store it in the loadingResponses Dictionary for the URL and then asynchronously return the eventual value of the task or throwing a possible error.
Back to the defer at top of the function. This one:
defer { loadingResponses.removeValue(forKey: url) }
If you think about it, we have a shared Singleton of ImageCacheActor which has a NSCache and a Dictionary<URL: Task<(UIImage), any Error>]. That Task will hold on to the value as long as we keep it around. In essence, it could be our own cache if we wanted it to but, NSCache has some nice features such as flushing memory, if needed, that we get for free. In order to hold less memory, let’s remove the Task from the dictionary and it will get freed up.
This is the end of our big func load(url: URL) async throws -> UIImage function!
But why a function for setting the image to the cache?
If you try to set the object directly on the NSCache via cachedImages.setObject(image, forKey: url as NSURL), you will get the helpful message of Non-sendable type 'NSCache<NSURL, UIImage>' of property 'cachedImages' cannot exit main actor-isolated context; this is an error in the Swift 6 language mode. Calling with an await doesn’t matter. This is why we come up with this function:
    @MainActor
    private func setCachedImage(_ cachedImage: UIImage, atUrl url: URL) {
        cachedImages.setObject(cachedImage, forKey: url as NSURL)
    }
The property we are trying to alter is @MainActor so let’s annotate this function the same. Once we do that, we can set the property directly in this function and cross the contexts by awaiting when we call it.
Table/Collection View Implementation
You can look at the diff for this change but previously Apple set the image no matter of what it was and, even if the image was loaded, it would fetch the image no matter what. Now, this isn’t a big deal because we pull from the cache but it seems unnecessary. Now, we have a three step process:
- Does our model object have it? Use that.
- Does the shared cache have it in their
NSCache? Use that.
- Set a placeholder image and go fetch the image, like so.
In order to fetch the image, we create a Task where we use our new ImageCacheActor to load the image from the URL asynchronously. If an error is thrown, we now set a broken image. Then it is a matter of setting the image to the Item that is used to drive the diffable data source and then asynchronously apply the updated snapshot. The cell will reload and it will use the first scenario of the model object’s image.
In Conclusion
That was a massive change!
We have some optimizations done here where we are no longer holding onto an array of completion handlers which themselves held a strong reference to the collection views. Additionally, we do not load the cached version of the image even though the item has loaded it and it is stored in memory in the Item.
From a code organization standpoint, we had to shift some blocks of the code around now that we were no longer capturing functionality and storing it for later. Instead, if we have a loading task in progress, we ask subsequent requesters to wait for the first call.
Coming up in part 4, we’ll be focusing on that URLProtocol subclass.
Alright, in part 1, I laid out the code structure is for Apple’s Async Image Loading sample code. In this session, we’ll update the settings of the project which is located here:
Updated Code Repo
Updating the Project
First thing is that we want not capture self in closures, add func urlProtocol(_ protocol: URLProtocol, didReceive response: URLResponse, cacheStoragePolicy policy: URLCache.StoragePolicy), modernize the Xcode project settings, and, most importantly, turn on Swift 6 and Strict Concurrency Checking to Complete.
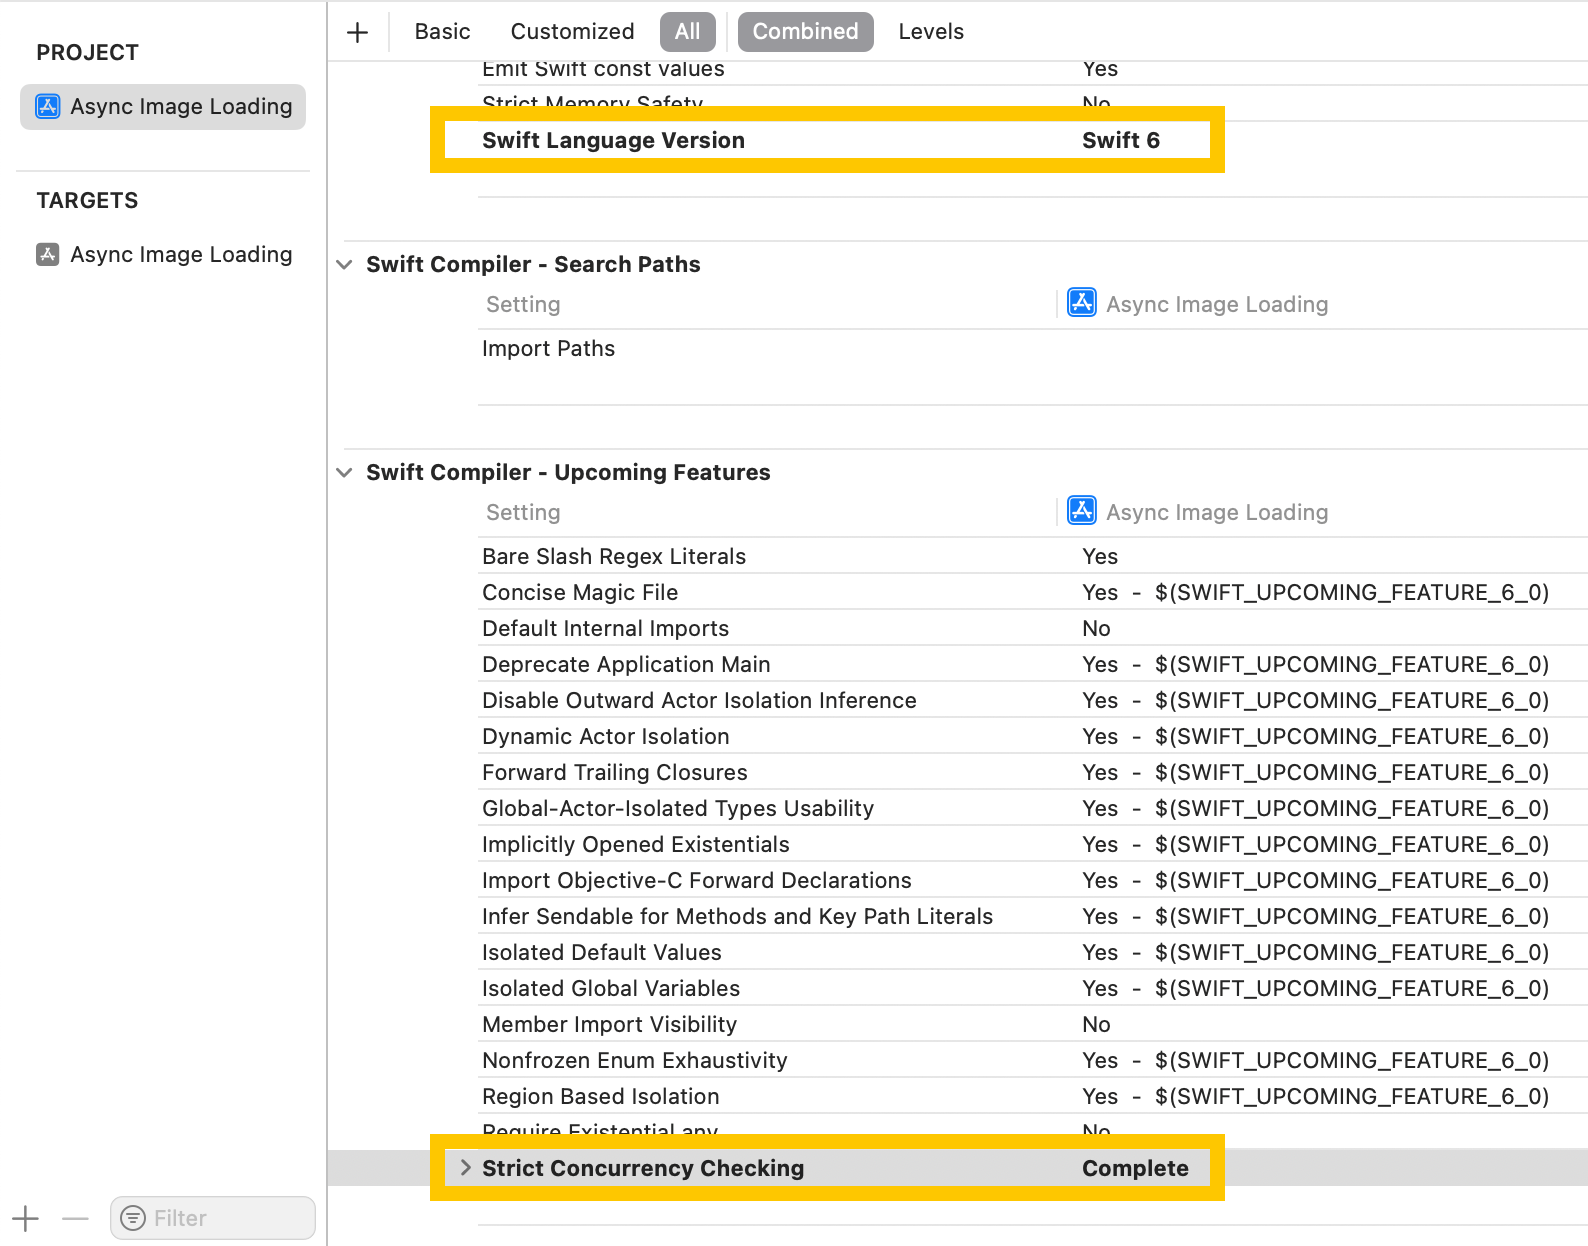
We also want to bump the minimum deployment target to iOS 18.0.
Two Bugs
[weak self]
When using completion closures and classes, it important to make sure you’re not capturing a reference to self in the closure in case the closure is never called which would cause the strong reference to self to never be released.
Apple does this in a could places and it’s important to fix those even though we’ll probably replacing the closures with async/await variants.
URLProtocol Did Receive Response
For some reason, when using Apple’s code this does not crash but when changing to an Actor later, it does crash.
The documentation is sparse and gives no indication what might be required. There is this ancient code sample but it says that the authentication calls are also required but I’m not seeing that. but Stack Overflow comes to the rescue.
Well, let’s fix that here.
Ready to Go
With those changes done, we are ready to make our modern changes so look for that in part 3 and part 4.
Introduced in Swift 5.5 way back in September of 2021, what I’m going to call “Structured Concurrency” is a mixture of async/await, Task, and Actors. In short, though, it’s the way to accomplish potentially long-running operations in a way that can be checked by the compiler in order to reduce (but not completely eliminate!) race conditions and corruption of data.
For me, these new technologies has been a very difficult concept to grasp. New concepts to grasp being difficult is nothing new. I remember struggling with Swift after Objective-C being the only programming language I used on a daily basis ever. I remember struggling with SwiftUI after 10 years of using UIKit. The difference with these was that if you failed, it was easily visible but also the community was sort of failing and learning together in a relatively short amount of time. Additionally, there was no pressure to adapt either language as Objective-C interop was there from the beginning and SwiftUI adoption wasn’t really feasible until recently just because so many APIs weren’t at par with UIKit. If anything, with Swift 2 to 3 conversion being super painful, it actually benefitted you to sort of sit back and wait.
Structured Concurrency is not similar to either Swift or SwiftUI becuase if you want to use Swift 6, odds are you’re going to want to learn the techniques to make it correct otherwise you’ll start getting warnings and errors in your code base. Whereas you can still write apps in Objective-C in UIKit, Apple is somewhat forcing us to adopt this model and if they don’t someone else on your team might.
So, what am I to do? My idea is to take a piece of Apple sample code and convert it over to something that uses async/await, Tasks, and Actors. I might not get it right but I seldomly do the first time and that’s okay as long as I try. In this first post in a series, I’m going to talk about the code that is posted by Apple in order to give an overview of what’s happening before I convert it.
Asynchronously Loading Images
The code from Apple is posted here and is from March of 2020.
Normal UIKit Setup
There is a UICollectionViewController and UITableViewController subclass each which utilize two bespoke mechansims to fetch images asynchronously.
In each of these subclasses, they access the image within a diffable data source cell registration. Because it uses a diffable data source, it needs an object that is the basis of the snapshots. In this case, they call it Item and it looks like this:
class Item: Hashable {

    var image: UIImage!
    let url: URL!
    let identifier = UUID()

    func hash(into hasher: inout Hasher) {
        hasher.combine(identifier)
    }
    static func == (lhs: Item, rhs: Item) -> Bool {
        return lhs.identifier == rhs.identifier
    }

    init(image: UIImage, url: URL) {
        self.image = image
        self.url = url
    }

}
That’s right, it’s a class that has a var image: UIImage!. Within both the collection and table view controllers, they instantiates the Items with a placeholder image which is initially shown. Later, we will asynchronously fetch the correct image at the URL and replacing that image. We’ll be taking a look at the UITableViewController version that does that when it makes the cell registration for the data source.
dataSource = UITableViewDiffableDataSource<Section, Item>(tableView: tableView) {
    (tableView: UITableView, indexPath: IndexPath, item: Item) -> UITableViewCell? in
    let cell = tableView.dequeueReusableCell(withIdentifier: "cell", for: indexPath)
    /// - Tag: update
    var content = cell.defaultContentConfiguration()
    content.image = item.image
    ImageCache.publicCache.load(url: item.url as NSURL, item: item) { (fetchedItem, image) in
        if let img = image, img != fetchedItem.image {
            var updatedSnapshot = self.dataSource.snapshot()
            if let datasourceIndex = updatedSnapshot.indexOfItem(fetchedItem) {
                let item = self.imageObjects[datasourceIndex]
                item.image = img
                updatedSnapshot.reloadItems([item])
                self.dataSource.apply(updatedSnapshot, animatingDifferences: true)
            }
        }
    }
    cell.contentConfiguration = content
    return cell
}
Walking through this, the cell gets dequeued from the table view and we make a content configuration. It immediately sets the item’s image to the content configuration’s image property. This could be the placeholder but, later, it could also be the real image. At this point, even if it isn’t the placeholder image, we still go and fetch the image at the URL. We’ll talk about that block of code in just a minute. While that asynchronous work is being done, the cell’s content configuration is set and we return the cell.
In the closure, when the image comes back from an undetermined timeframe, we check to make sure the image is not nil and that the fetched image is not the image previously set. This seems inefficient since we are making a network call (or getting the cached data) no matter what but then again, we are also capturing self in the closure and not making it weak but pobody’s nerfect. Moving on, we make a mutable snapshot, get the index of the object we want to alter and get a reference to a reference to the item which we are storing in an array as a property. (In my opinion, I don’t think we should have two sources of truth with the diffable data source and this array.) We set the item’s image and then tell the snapshot to reload the item and apply the snapshot. It will then run through this cell registration again and set the cell configuration’s image to the updated image.
Image Cache
The ImageCache is an object that holds onto an NSCache with the key being the NSURL and the value being UIImage. The ImageCache also has a Dictionary where the key is NSURL again but the value is an Array of closures that has the arguments of (Item, UIImage?) and returns Void. They look like this:
private let cachedImages = NSCache<NSURL, UIImage>()
private var loadingResponses = [NSURL: [(Item, UIImage?) -> Swift.Void]]()
There is a simple function for returning an optional image from the cache using the url. Not entirely sure why it’s there and why it’s public given the only caller is the ImageCache itself.
The meat of the work is done in this big function:
final func load(url: NSURL, item: Item, completion: @escaping (Item, UIImage?) -> Swift.Void) {
    // Check for a cached image.
    if let cachedImage = image(url: url) {
        DispatchQueue.main.async {
            completion(item, cachedImage)
        }
        return
    }
    // In case there are more than one requestor for the image, we append their completion block.
    if loadingResponses[url] != nil {
        loadingResponses[url]?.append(completion)
        return
    } else {
        loadingResponses[url] = [completion]
    }
    // Go fetch the image.
    ImageURLProtocol.urlSession().dataTask(with: url as URL) { (data, response, error) in
        // Check for the error, then data and try to create the image.
        guard let responseData = data, let image = UIImage(data: responseData),
            let blocks = self.loadingResponses[url], error == nil else {
            DispatchQueue.main.async {
                completion(item, nil)
            }
            return
        }
        // Cache the image.
        self.cachedImages.setObject(image, forKey: url, cost: responseData.count)
        // Iterate over each requestor for the image and pass it back.
        for block in blocks {
            DispatchQueue.main.async {
                block(item, image)
            }
            return
        }
    }.resume()
}
Whew! The comments do a good job of explaing what’s going on there but we check for the cached image and call the completion if it exists. Next up, they add the closure to the array for that URL in the dictionary and return OR create an entry in the dictionary for the URL and an array with the first completion.
Moving on, we use the ImageURLProtocol.urlSession() (more on this later) data task with a completion that has the arguments of optional data, response, and error. We immediately resume that data task. When the data task is complete, the data task’s closure gets executed. Again, no [weak self] here but we first check the data, that a UIImage can be created with the data, that there is an array of closures to call, and that the error is nil otherwise we call the completion with no image (on the main thread). With those pieces, we then set the image to the cache but also go through each completion closure and execute it with the image (on the main thread).
ImageURLProtocol?
Did you know you can sort of override URLSession to have the same API but act differently? You need to create something that adheres to the URLProtocol. This is largely done in this protocol function:
final override func startLoading() {
    guard let reqURL = request.url, let urlClient = client else {
        return
    }

    block = DispatchWorkItem(block: {
        if self.cancelledOrComplete == false {
            let fileURL = URL(fileURLWithPath: reqURL.path)
            if let data = try? Data(contentsOf: fileURL) {
                urlClient.urlProtocol(self, didLoad: data)
                urlClient.urlProtocolDidFinishLoading(self)
            }
        }
        self.cancelledOrComplete = true
    })

    ImageURLProtocol.queue.asyncAfter(deadline: DispatchTime(uptimeNanoseconds: 500 * NSEC_PER_MSEC), execute: block)
}
What is happening here is that we make sure we have a url and client but then set up a closure that will get the data from the URL and call the protocol’s functions signaling that the work is done. That closure is sent to a DispatchSerialQueue to be executed in 0.5 seconds. There is also a property (cancelledOrComplete) on the class that signifies that it is done.
This cancelledOrComplete is used in case the data task is cancelled.
final override func stopLoading() {
    ImageURLProtocol.queue.async {
        if self.cancelledOrComplete == false, let cancelBlock = self.block {
            cancelBlock.cancel()
            self.cancelledOrComplete = true
        }
    }
}
This class also has a deprecated OS_dispatch_queue_serial which is renamed DispatchSerialQueue.
In Conclusion
Okay, we have three pieces that need to be addressed.
- We have our table/collection view call sites that have an asynchronous closure to update the model driving the diffable data source.
- We have the object that asynchronously returns the cached image or fetches the image data and manages all of the requests to do so.
- We have an override for
URLSession that gets the image off disk and returns it after a half second.
In the following parts of this conversion, I’ll be working from the bottom of this list up to the table/collection view. As a bonus, I’ll be using this modern mechanism to drive a SwiftUI equivalent view. Up next is part 2!
@Bindings
In his post about Bindings, the delightful Chris Eidhof gives an overview about how synthesizing SwiftUI Bindings might not turn out how you expect. The tl;dr is using Binding(get:set:) might be convenient, but can introduce performance bottlenecks, especially in complex views or when creating member bindings. Chris recommends against using this in production code.
As someone who has used a Binding(get:set:) in production, I wanted to investigate a little further as well as give a little backstory as to why you’d want to use Binding(get:set:) in the first place.
SwiftUI Alert
I’m going to use SwiftUI Alert as an example but there are other instances in SwiftUI where the view modifier that dictates whether something is to be shown takes a Binding<Bool>. It will this Binding get determines whether it will be shown and the set gets called when the alert is no longer shown.
The result is that you might have a @State var shouldShowAlert: Bool = false declared at the top of your view and you’re ready to go! Very few apps are simply there to show an alert. In fact, a determination to show an alert is usually dependent on a condition or state change with actual real data, e.g., a response object came back as nil. This means that you’ll probably have logic in your view that controls flipping your shouldShowAlert bool based on certain conditions. If you’ve been around, you might have read “logic in your view” and replaced it in your mind with “logic in your view that is not easily unit tested”.
So, you might write something like:
Binding(get: { return yourObject == nil },
	    set: { if $0 { resetState() } } )
When In Doubt, Measure
Fortunately, we have a tool at our disposal that might give some clarity as to whether it’s as bad as we suspect: Good Ol’ Instruments. As I learned at the delightful Bring SwiftUI to Your App workshop, Instruments has a SwiftUI template to measure how many layouts are occurring and how long they take.
You can find the code I used to measure here: https://github.com/jacobvanorder/BooBindings. My procedure is to put all examples in a TabView and then select the tab, present the alert, dismiss the alert, and wait five seconds before I try the next option. Also, I converted all of the timings to microseconds.
Option Number One: A State Property
In this option, you manually control boolean for showing the alert. Button gets tapped and we set the model object and flip the bool. The alert is driven by a @State bool variable that you’ll have to remember to flip each scenario that happens and will happen if you need to add on in the future.

We have 50 total layouts with a duration of 897.88 microseconds. Two of the layouts are for the ViewLogicBindingView itself.
Option Number Two: Synthesized
Here we use the Binding(get:set:) option. No extra @State property and no logic to maintain.
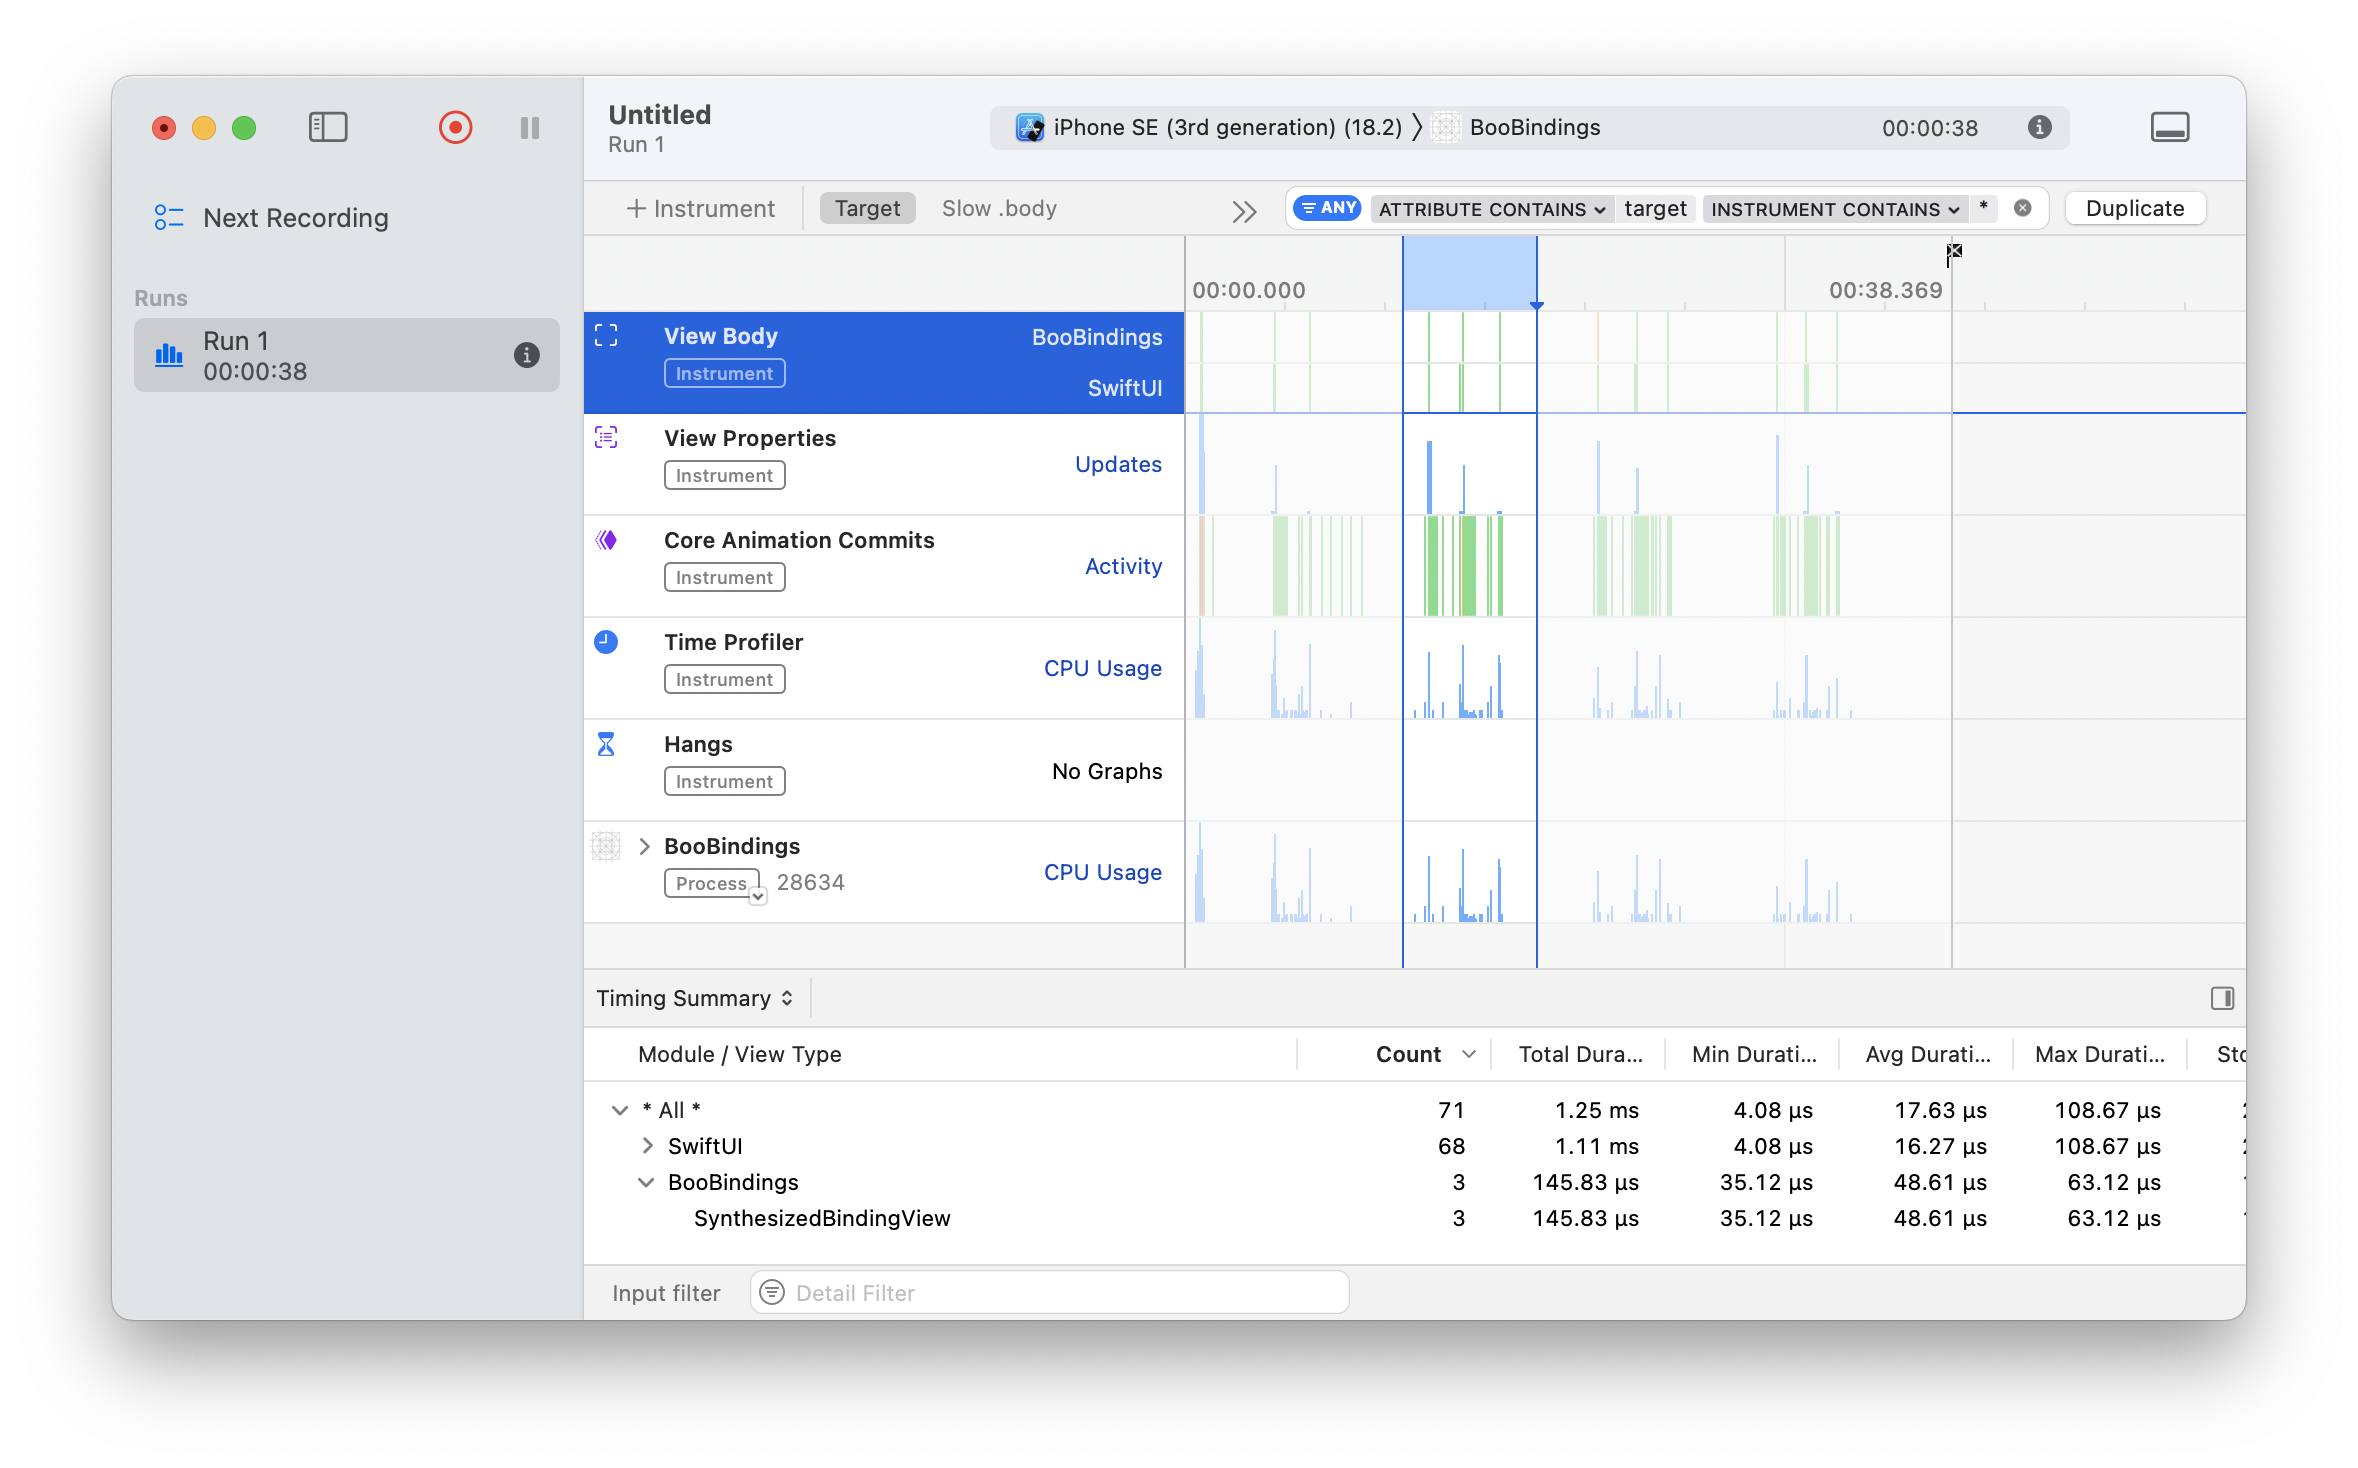
We have 71 total layouts with a duration of 1,250 microseconds. Three of the layouts are for the SynthesizedBindingView itself.
Option Number Three: View Model Driven Option
At the “Bring SwiftUI to Your App” workshop, they also talked about they preferred using @Observable classes when the logic within a view gets unwieldy or difficult to manage. In this case, I create a view model that has both the model object and a var boolean. When the object gets changed, so does the boolean in a willSet on the object. This class is then used as a @State var on the view itself and will trigger a view update when variable change. The plus side to this is that you can unit test this class independently and fairly easily.

We have 56 total layouts with a duration of 2,620 microseconds. Three of the layouts are for the ViewModelDrivingView itself. That is considerably slower, though.
Option Number Four: Side Effect on the View
What if we got rid of the view model but had similar logic on the view where you have both the model object and a var boolean. Again, when the object gets changed, so does the boolean in a willSet. Can’t easily unit test but thems the breaks.
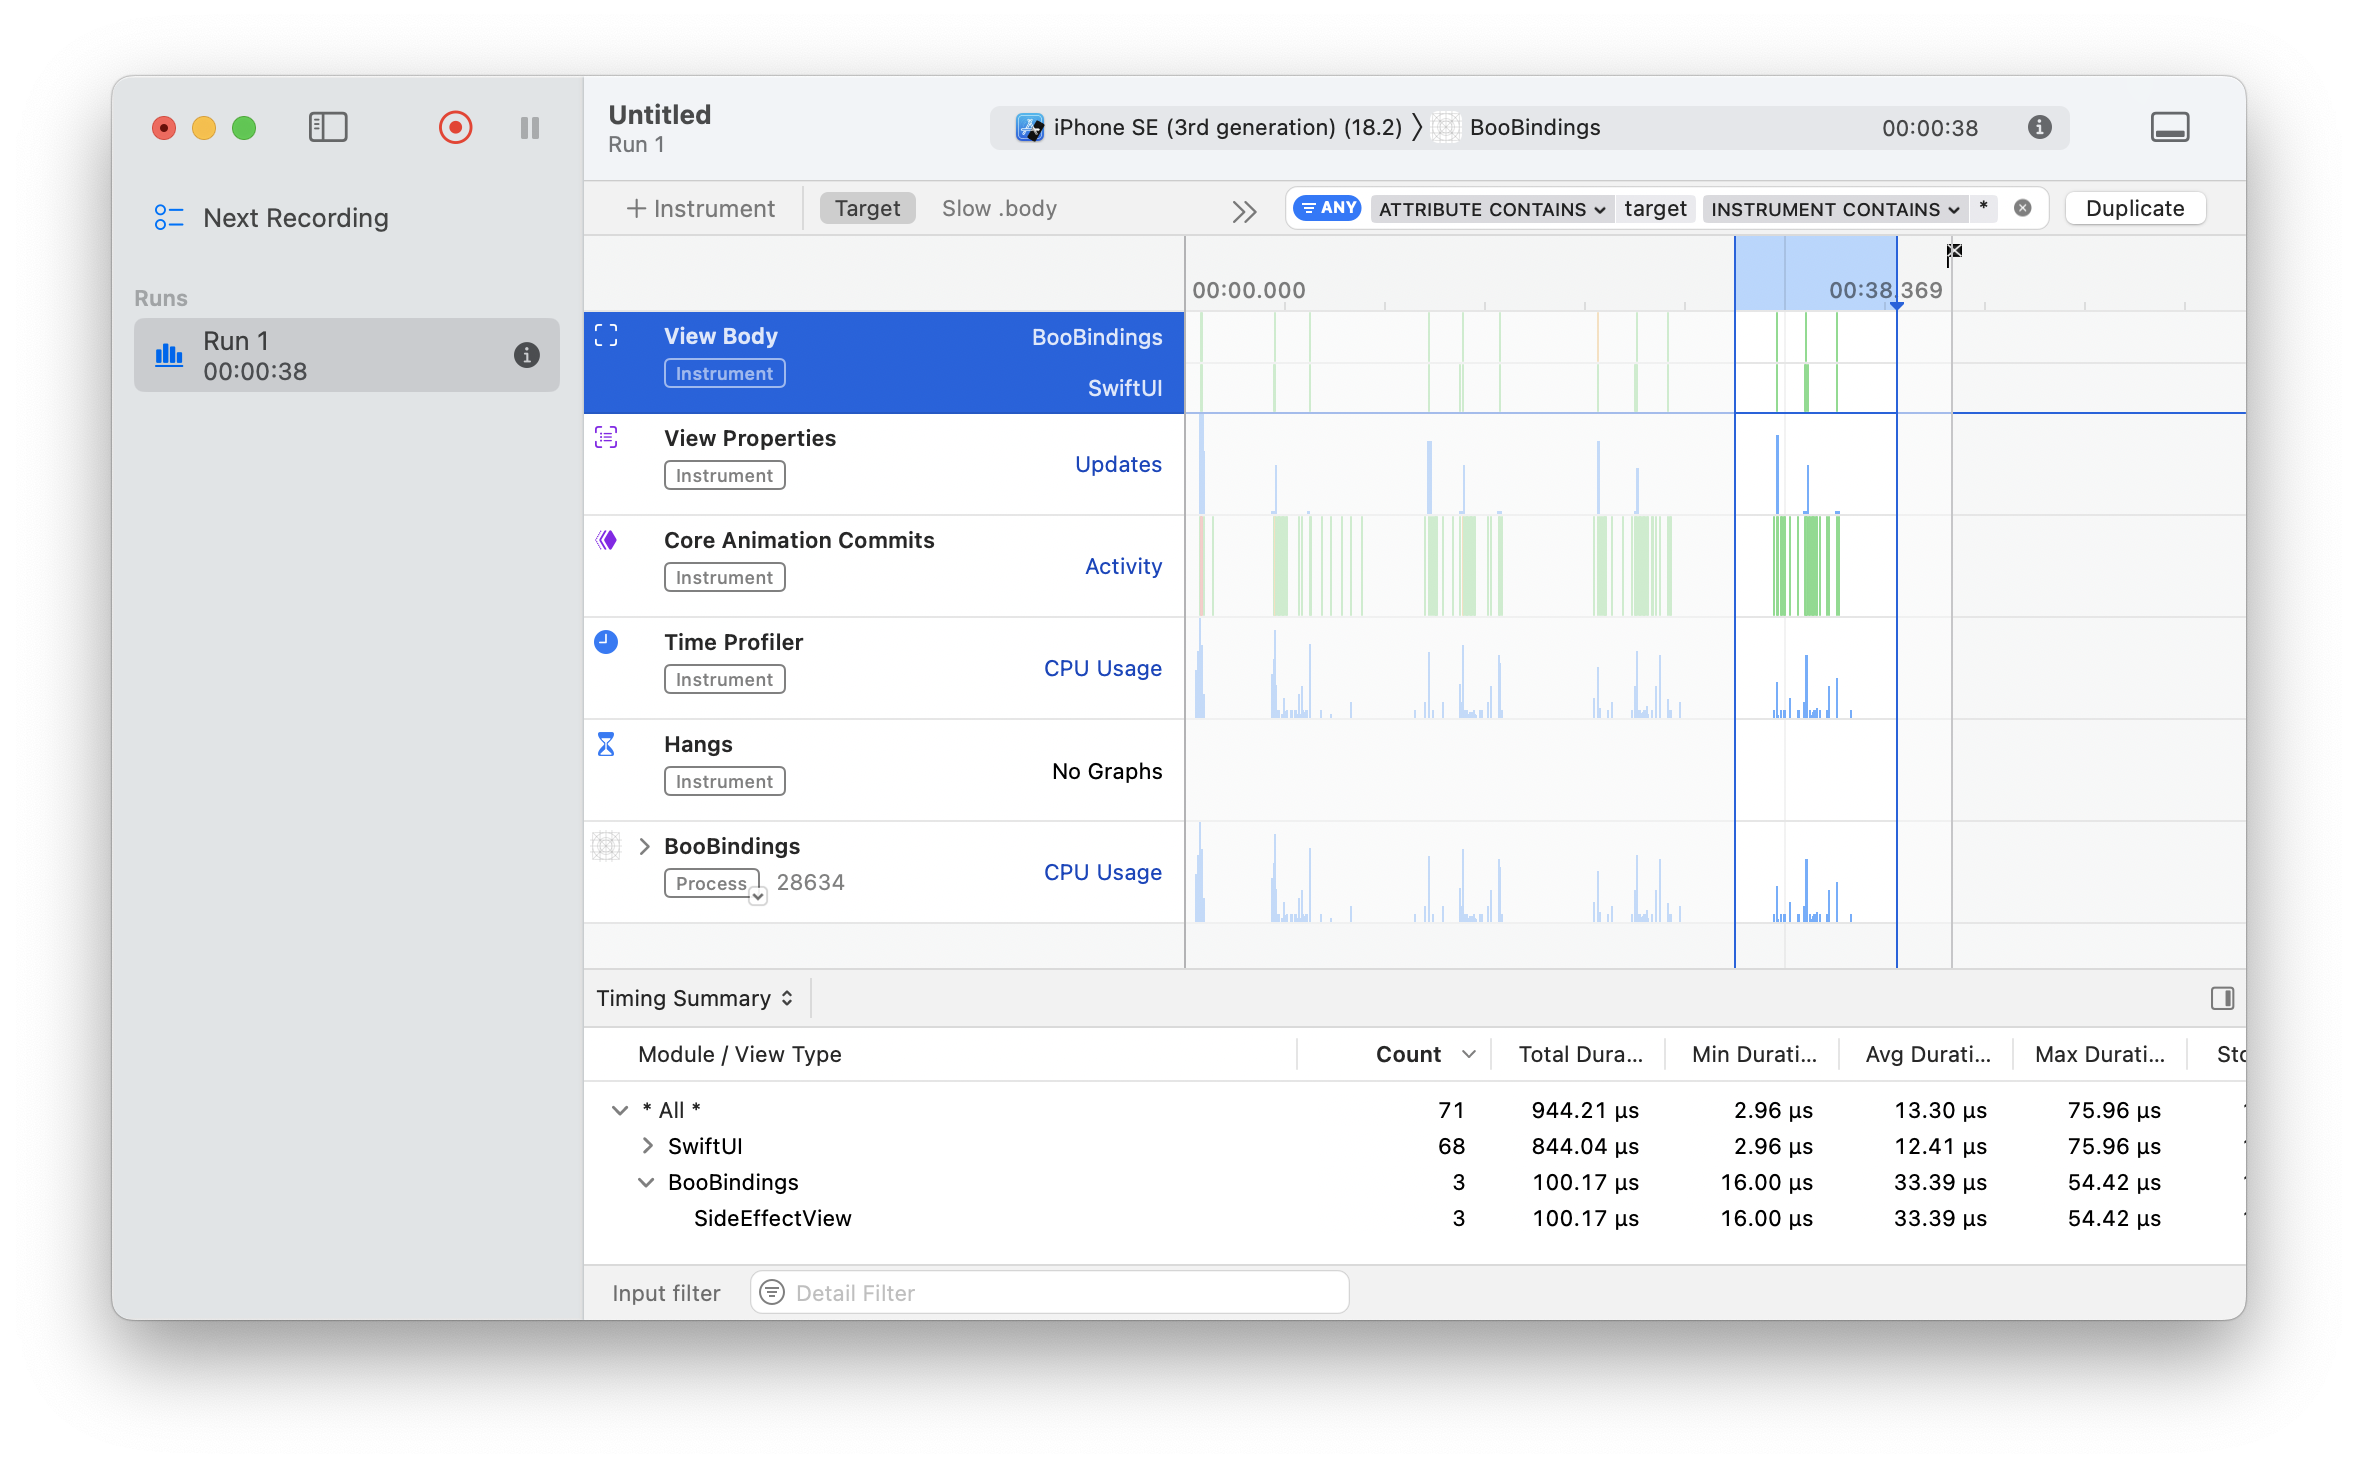
We have 56 total layouts with a duration of 944.21 microseconds. Three of the layouts are for the SideEffectView itself.
In Conclusion
From a purely numbers aspect, the simple solution is the winner and the view model class is the loser but there are other factors to consider. This was the easiest example I could cobble together on a Sunday. Real world apps have complex scenarios that should be unit tested and are maintained by teams of people with varying skill levels.
The real answer to whether you should use Binding(get:set:) is to consider the trade offs of doing so. Run it through instruments and then consider whether the logic you’re introducing is easily testable and maintainable.
Estimation is a Trap
As a software developer, you’ll often be given a list of requirements, immediately followed by, “When will it be done?” It’s a perfectly reasonable question! The person asking probably has a boss and needs to provide an answer when they are asked the same question, because, well, their boss is asking the same thing. Additionally, knowing when something will be done helps others prepare for the next step in the software’s lifecycle. Again, all reasonable!
We, as problem solvers, have tried to come up with systems to predict the future using Agile methodologies, points, and burndown charts, as if a million different variables aren’t at play all at once. We’ve even turned it into a nice game! Or, instead of a number, we can use garment vernacular! How fun!
So, why is it a trap?
Let’s discuss underpromising and overdelivering. It’s a combination that often goes well together. However, when tasked with estimation, it’s very easy to slip into the realm of overpromising and underdelivering. It’s not that you mean to; you had the best intentions after all. It is a perfectly natural tendency for humans to do this, not just with time but also with time’s close relative, money. Sometimes, both time and money are improperly estimated, especially in government projects. If you maintain a home, you know how an expert can come in, give an estimate, and then blow right past it significantly.
Some people are well aware of the sunk cost fallacy and will use it to their advantage. In Robert Caro’s “The Power Broker: Robert Moses and the Fall of New York”, there are stories where Moses would estimate a fraction of the true cost of a public works project. He’d start the project knowing full well that legislators wouldn’t want an empty hole where a highway should be when the initial funds ran out.
Well, can I just not give an estimate?
Ah, yes! The only way to win is not to play! Unfortunately, you will be viewed as stubborn and unhelpful. I once worked with someone who would cross his arms, put his nose in the air, and state that he simply wouldn’t estimate. My dude, it’s not like the person asking is doing it for fun! Show some empathy and work with your comrade, alright? If you don’t provide the estimate, sometimes the person asking will just come up with their own, which is usually based on fantasy, but there’s still an expectation that you’ll meet that made-up deadline. No one wants that.
But why are we so bad at it?
Bias, ego, and a willingness to please.
For those of us with a breadth of experience, when given a task, we instantly reach back into our memory banks to remember if we’ve dealt with a similar task before to use as a baseline. Our own biases color this measurement, and other factors might have changed, impacting your progress. Plus, we think we’re really good at our jobs. So good that this time will be a breeze.
If you don’t have that breadth of experience or if you feel uncertain, you might blurt out an estimate that you think will impress the person asking. It’s okay! We all do it. Being fast is often equated with superior skill. If you give a quick estimate and then meet it, it just proves how awesome you are.
These factors lead to you not being able to say the truth, which is that you don’t know for certain. If you’re just starting out or feel insecure in your job, showing those cards feels like a weakness.
So, what’s the plan?
There are a few tools I use to try to give the best possible answer when put on the spot, but some of them won’t work if you don’t work in a safe and trusting environment. That’s a whole other issue I haven’t solved yet but fortunately don’t have to deal with currently.
Confer
The act of pointing tickets is essentially meaningless. We all say it’s not based on time, but you and everyone else knows that it is. The real value in pointing is discussing with your peers what you need to accomplish and how you might approach it. They might have a better solution, know of potential traps, or ask clarifying questions. As a more seasoned developer tasked with estimating as part of being a lead, your guess is based on what it would take you to accomplish the task, not accounting for various levels of experience and skill. Team members of varying skills pointing allows you to remember that, as long as they feel comfortable expressing their real number. The downside of this approach is that it takes time and requires context switching for your team. It also obviously doesn’t work if you’re alone on your team.
Spike
If you work in an environment where you can say, “I’m not sure, but I can quickly gather some info for a better guess,” this can also lead to a better estimate. If someone is asking you to do something you’re not certain about, determine a set time to do some research to gain knowledge about whether the task is even possible. This requires looking into your own code, documentation, institutional knowledge, and resources like Google, Stack Overflow, and blogs. Try to gauge how complex it is based on what others have gone through to accomplish a similar task, bearing in mind that their experiences may also be biased.
Discuss Tradeoffs
Perhaps there are three easy parts of the task, but one part is unknown, such as a wild animation or a new navigation style or technology you aren’t familiar with. Have a discussion with the person asking. Maybe they are flexible about it. Don’t just say, “No, I won’t do that.” Explain that it’s an unknown but offer a solution. Perhaps the wild animation is not crucial, or a time-tested navigation style might suffice. Just discuss it and let the person asking know the cost associated with what they’re requesting. After all, they don’t know, which is why they are asking you.
Fudge
If you don’t have any of these luxuries or if you work somewhere that doesn’t understand that you’re making your best guess, then take the time that is in your head and double it. This gives you a buffer for a busted code base, sudden requirements, sickness, and other unknown obstacles. I understand this takes confidence because you might fear that stating a longer time will result in being replaced by someone who can meet the original expectation. However, if they balk at the extended time, try discussing what could be trimmed so you can be more confident in meeting the revised deadline. “But what happens if you finish in half the time? Won’t that hurt your integrity?” If it’s extremely egregious, yes, but generally, the person asking will be thrilled that it’s ready, and that will outweigh any concerns. Most of the time, issues arise, and you’ll be glad to have that padding.
Constantly Communicate/Document
Even if you have the luxury of using any of the aforementioned tools, but especially if you don’t, it’s in your best interest to communicate your current status to the requesting party. Show progress, communicate roadblocks, discuss how incoming requirement changes might impact the timeline, and if something that seemed easy turns out to be challenging, explain why and offer alternatives. Document everything because what tends to happen is that the person asking stops listening after receiving an estimate, especially when new requirements come in after the estimation. Beware! Even with after doing all that copious communcation, I have been bitten when I didn’t meet a date I set months ago. If you have the documentation, it can come off as “I told you so” or blamey so tread lightly!
Embrace the Suck
In my opinion, estimation should be a combination of how long you think it will take and how certain you are about it. If you don’t feel confident and the requesting party wants a concrete date, you should be given time to shore up any blind spots.
I like to use the analogy of cooking when explaining this to people who insist on a specific date:
I ask them how long it would take to make a peanut butter and jelly sandwich and usually get an answer like “five minutes.” Then I ask, “What if your house were on fire, you were missing butter knives, and the bread was moldy? What if, instead of a peanut butter and jelly sandwich, you had to make fermented shark? What’s the estimate then?” This is somewhat analogous to being a software developer. But to extend the analogy, the person asking is usually the waitstaff, and the customer is really hungry, so understand that they are just doing their job and it’s all part of the system.
In a completely new app with a logical and sane API to interface with, I could spin up a table view in iOS within twenty minutes. But that’s not the world we live in. We work within imperfect code bases, interfacing with wacky APIs, dealing with scenarios not anticipated, while working with underdeveloped requirements, and handling shifting desires. I wish we could not only state how long it would take but also how certain we are about it to provide an over/under estimate. But people generally care about the date and not about how we feel about it. In the meantime, use the techniques above to highlight the hazards and complexities you’ll need to work around. If you know any other techniques, drop me a line!
Vision Pro!
Let’s not get into how $3,500 could be better spent, if this is really the best time for the release of this hardware, or if iPadOS was the best choice of a platform to base “spatial computing” on.
It is what it is.
I truly believe that a form of what the Vision Pro is will be integral to computing in the future. I don’t think it’s as good as the first iPhone in terms of hitting the target right at the start but I hope it’s not like the iPad where a promising beginning is hampered by being tied to an operating system that limits it.
Presenting 3D Models
I don’t think that, unlike the phone, the compelling mode of the Vision Pro is looking at an endless scrollview of content. Instead, being able to see a 3D asset in stereo 3D gives the most bang for the buck. Watching a movie on a place on screen the size of a theater is cool but watching truly immersive material wherever you are is that much more special and worth the tradeoffs of having a hunk of metal and glass strapped to your face.
Different Methods of Presenting a 3D Asset
As I posted before, there are ways to generate 3D assets using your phone. As a brief update, Apple has released this functionality now completely on your phone and the results are spectacular. You can generate a 3D model using your iPhone but, grumble, grumble, not on your $3,500 Vision Pro.
Unlike on the phone, though, VisionOS provides very easy ways to present the 3D content to the user whether embedded within the user interface or within a more freeform manner. In this post, we’ll be touching on the more simpler form of presenting 3D content. The more complicated form, RealityView could fill a series of blog posts which I’ll be tackling.
The sample code for these examples is here.
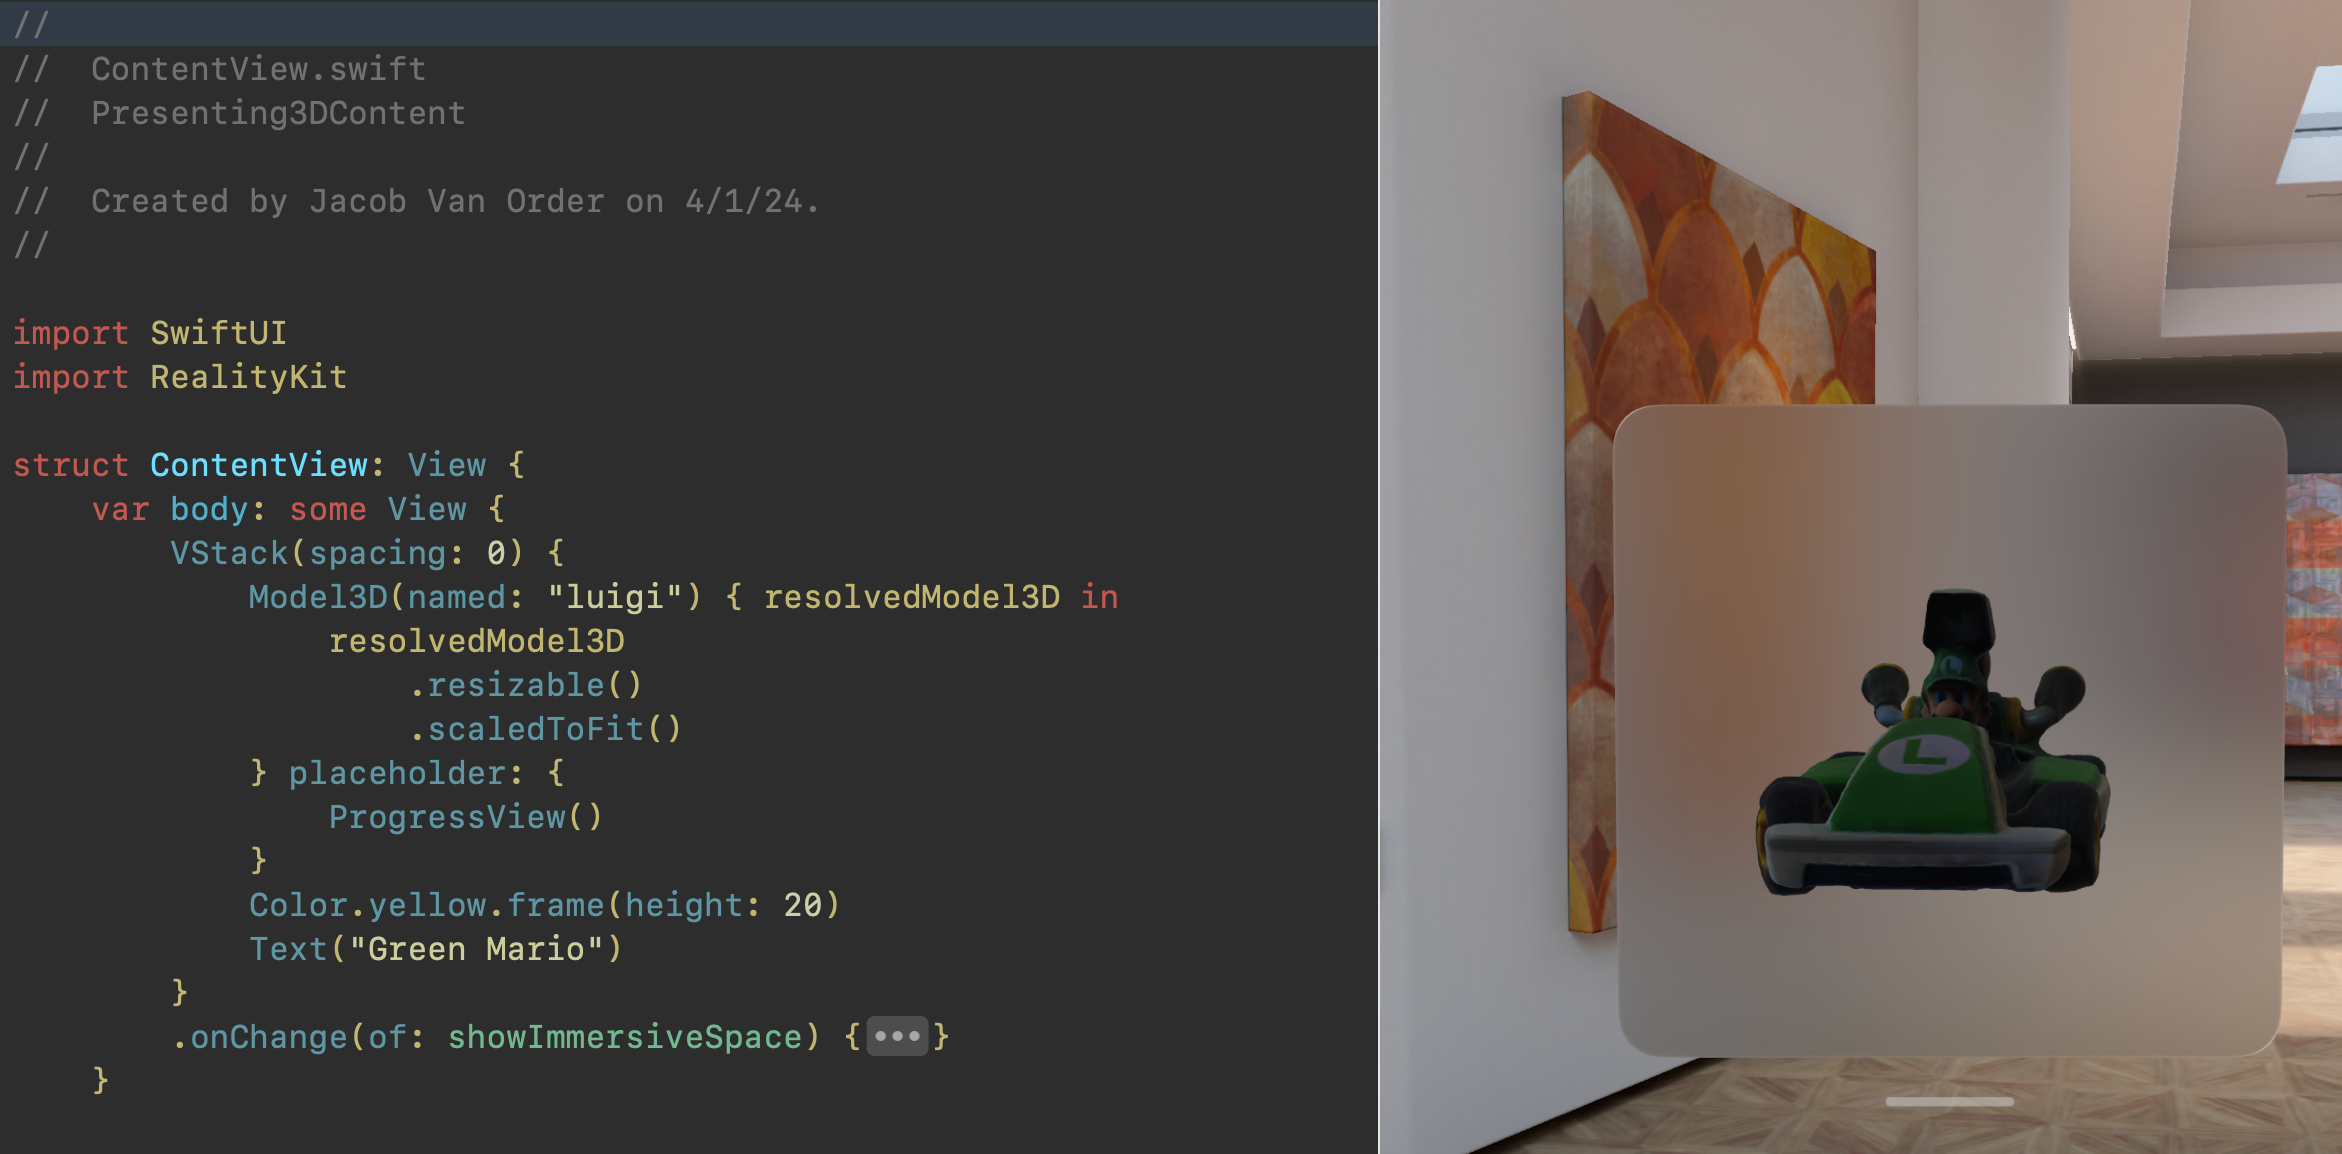
Model3D
Model3D is a SwiftUI view that, in the words of the documentation: “asynchronously loads and displays a 3D model”. This, though, undersells it’s capability. It can do it from a local file OR a URL. Because both of these methods can be time consuming, it is done in a way similar to the AsyncImage view does for images loaded from the network.
This means that you have the view itself but then, when the 3D asset is loaded, you are presented with a ResolvedModel3D that you can then alter.
Animation
Given we have this 3D asset in our space, we can then animate the content just like we would a normal SwiftUI view but, again, this will need to be done to the ResolvedModel3D content. The traditional way of a continuous animation would be where you add a @State property that keeps track of if the content has appeared and uses that to use as the basis for the before and after values for the animation. Then it is a matter of using the new rotation3DEffect on the resolved content. Alternatively, you can use the new PhaseAnimation and not have a need for the @State property.
For either way you go, beware that the layout frame might not be what you expect. Alternatively, because the layout is based on the width and the height of the model but not the depth, when you rotate along the y-axis, the depth will now become the width and you layout might look wrong. You can utilize the new GeometryReader3D in order to gather the height, width, and now depth of the view and adjust accordingly.
Gestures
For both examples, we’ll be modifying the views with .gesture but whichever gesture we choose, we need to tell the view that these will apply not to the view but to the entity contained within via the .targetedToAnyEntity() modifier on the gesture. You can also specify which entity you want to attach the gesture to by using .targetedToEntity(entity: Entity) or .targetedToEntity(where: QueryPredicate<Entity>). The .onChanged and .onEnded modifier will now have 3D-specific types passed in.
Drag Gestures
We can use a traditional DragGesture in order to rotate the content using the rotation3DEffect we used for the animation. In the example, we have a startSpinValue and a spinValue that we’ll be keeping track of. The difference between the two is that startSpinValue is sort of the baseline value that we keep track of while the drag gesture is happening. We get the delta of the drag by calculating the difference between the start and current position and applying that plus the startSpinValue to set the spinValue. If we did not have the startSpinValue, if we were to rotate the entity for a second time, it would begin rotating from 0.0 and not from the previous value we rotated to.
Rotate Gesture 3D
Because this is the Vision Pro, you can rotate by pinching both of your hands and acting like you’re turning a wheel in space in order to rotate an item. This will allow you to save your drag gesture for when you want to move your item but still reserve the ability to rotate it. The code for this example is different because we don’t store a value of amount we are spinning the entity but we do have an optional value that is meant to be the baseline value of the rotation that has happened. Additionally, we don’t use the rotation3DEffect and instead change the entity’s transform value by multiplying the baseline value times the gesture’s rotation value. I added Model3DDragGestureAltView in order to show how you might do this way of rotating the item using the drag gesture.
Gotchas
Because you have a container of the Model3D and then the actual content of the ResolvedModel3D, you can get into a situation where the layout frame of the container might not be what you expect it to be based on the actual content.
Sizing
Just like AsyncImage, the view doesn’t know the resulting content size. Usually, it “just works” but if you start animating or altering the resolved 3D content, be aware that you’re not dealing with both width and height but also depth.
For instance, because it defaults to placing the content where the back is placed against the front of the view you are placing it in, perspective and the depth of the model might hide the other content in the VStack or HStack so be mindful.
View Modifiers
Because these are all extensions on View that throw a view modifier into the great next responder chain that is @environment, view modifiers such as blur(radius:) or blendMode(_:) don’t work but .opacity(_:) does (grumble, grumble, grumble).
I Built a Keyboard (Part 2)
Previously
In the last post, I talked about my ability to solder, my progression of keyboards, and how I rolled the dice on a pre-made Sofle RGB from AliExpress.
Keyboard (Number Two)
Procurement
With the first keyboard in a box and ready to go to China, I figured I’d give this whole thing a crack the conventional way. Previously, I explained that because the keyboard is open source, it’s possible to have the pcb fabricated and to source the parts yourself. I wanted to speed that process up and found that there are websites dedicated towards making the process easier but, again, to the extent that you might need a spreadsheet to determine if you have all of the items on the Bill of Materials. What I mean by that is that some vendors would have the kit but not a microcontroller. Some would include the microcontroller but not the rotary encoders. Also, these things would be for sale on their website but maybe not.
What I ended up going with was a kit from diykeyboards.com. Again, they were missing microcontrollers and rotary encoders from the kit but they did have it on their site and it was not sold out. Shipping was relatively fast with it being in Pennsylvania.
Actual Building
Following a combination of the official but also better instructions from another vendor. Between the combination of these, I was on my way.
First Couple Steps
I needed to flash the microcontrollers with the firmware from the Beekeeb site. Next was the step of soldering the SMD diodes on to the board. SMD are usually difficult but this was no problem as the diodes were not super small. I had to bridge some pads so that the pcb, which is double sided and ambidexterous, knows which side to use. Remember how I fried my previous microcontroller? I wanted to avoid that by adding sockets to the board for the microcontroller and pins for the microcontroller. Unfortunately, the pins that the site included with the microcontroller were too large for the socket holes and I had to improvise by using 24AWG wire and soldering them in, one by one. I had to do this later with the OLED display as well.
At this point, I could test it by plugging it in and touching the contact point with tweezers. Luckily, everything worked and I could continue on. The Kailh switch sockets were next and that went seamlessly too. TRS jack, reset button, rotary encoder, OLED display? Check, check, check, check. I had to jumper some pads which determine which lighting configuration I’ll be using. No problem there.
LEDs from Hell
Now come the LEDs. The keyboard has 72 LEDs and the kit included 80 of them. For the status indicator and backlights, these are surface mounted which means that you need to douse the board with flux and pray that the LED is flat enough and that the solder wicked up from the pad, which you can see, to the underside of the LED, which you can’t. Oh, and because each LED has a little bit of logic in it, you can’t overheat it otherwise it will die. This was challenging but I got those first 7 LEDs on with little to no problem.
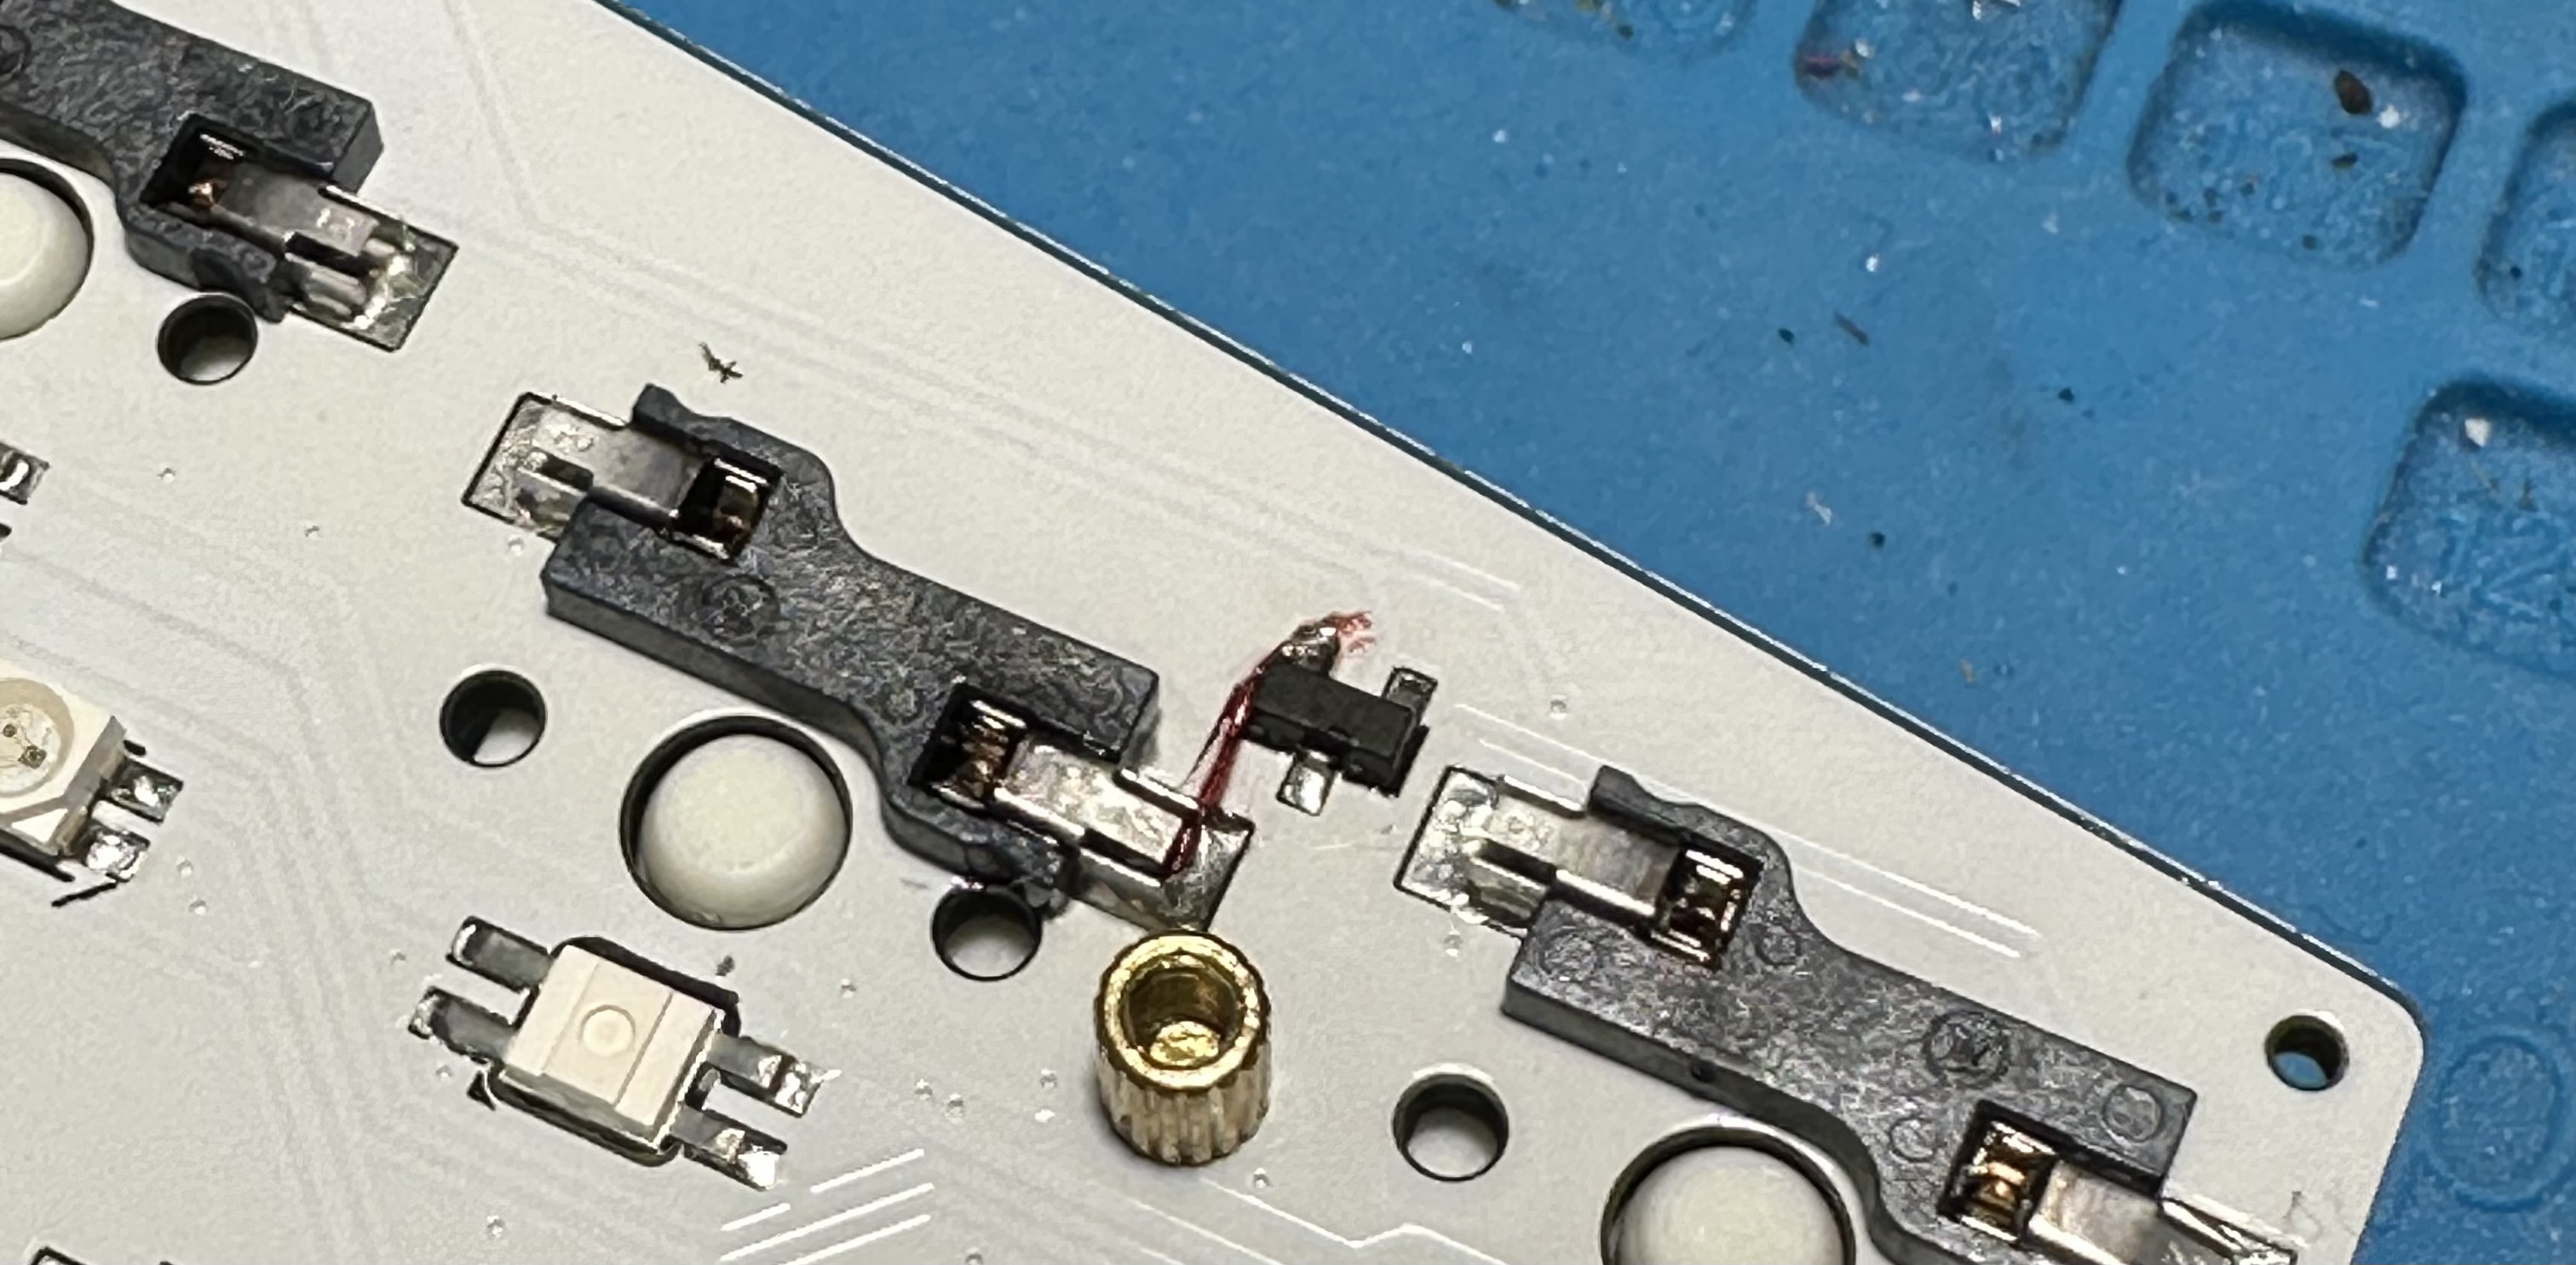
In order to do the per-light LEDs, I needed to place it in a hole in the PCB in the correct orientation.

The tolerance here was so tight but you had to gently nestle that LED in just right and in the middle. Then solder it with absolutely no gaps. So, I followed the instructions of soldering the LED and testing but it wouldn’t work and was super frustated. Did I have an air gap in the solder? Did I overheat the LED? Was the LED faulty? I would remove it and toss the LED and try again with no luck.
It is here I’d like to stop and point something out. Take a moment to look at this image:
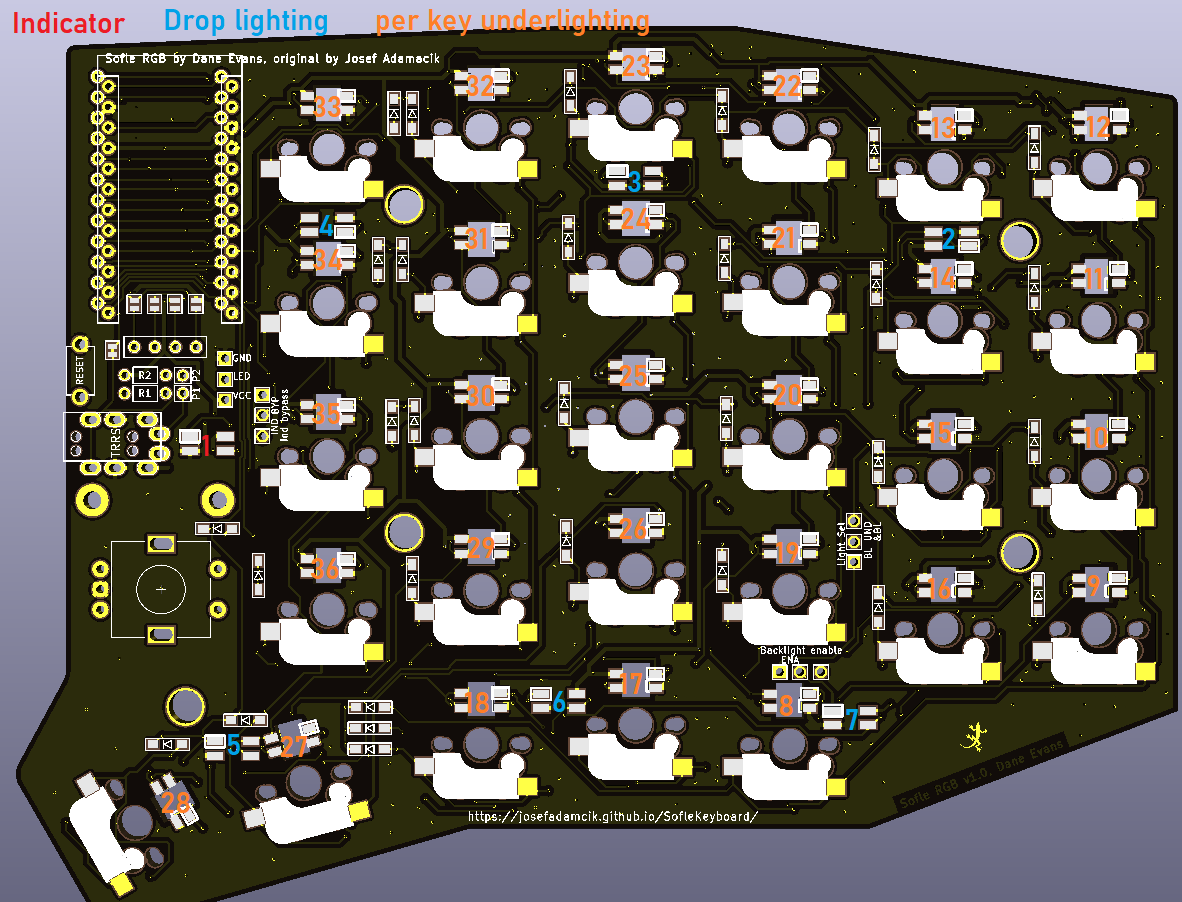
Does anything strike you about this? This is from the official documentation and not the much more, up to this point, comprehensive Beekeeb documentation. It turns out that the LEDs (SK6812) are commonly used in those strips of LED lights and each one is addressable but this means that they need to be in a chain and that’s how the circuit board is configured but going off of the Beekeeb documentation, this is not clear.
Once I figured that out, It made more sense and made it easier to debug as I could trace down the LED that was prone to any of the issues I just mentioned. By the point I figured this out, though, it was too late and I had blown through my extra LEDs. I wouldn’t have enough to finish the entire thing.
Assembly
The rest went super smooth. Sockets went in without ripping pads off, unlike the first keyboard. I didn’t have a case yet but I was able to test things out without much worry.
Software
There is an open-source keyboard software package called QMK that I mentioned in the first part. The gist of it is that the keyboard makers add their keyboard to this repo and it is up to the user to clone this repo and compile it using the qmk tool. Configuration is done by editing a configuration locally and then recompiling.
This is done with the command qmk compile -kb sofle/rev1
Luckily, people have mercifully written software to go on top of QMK that enables altering the keyboard on the fly. The first keyboard used VIAL but when I went to try to install that, there was much thrashing about and nothing seemed to work.
It turns out that there is another GUI for this type of thing called VIA but it was mysterious as to how to get my keyboard to be recognized by VIA. The QMK firmware from the BeeKeeb tutorial was recognized but the QMK firmware I compiled myself wasn’t. There must have been something going on.
According to the docs, it was the steps of adding VIA_ENABLE = yes to the rules.mk file and then compiling. Then, when compiling the QMK firmware, I need to change the keymap to via with qmk compile -kb sofle/rev1 -km via.
After I did this, I was able to see the keyboard in Via in order change the keys & lighting and test the keys.
What the Heck
By this point, I had gotten another batch of LEDs from China and soldered them all in. It went smoothly but the last two on the right side would not work. I took them out, replace them, tested with the multimeter. I went to go reflash the firmware when I notice that when I plugged in the right side (in order to flash it), those LEDs which weren’t working were and the last two on the left side wouldn’t work.
It turns out that the QMK keymap for VIA is incorrect and has a constant of 70 LEDs when it should have 72. Luckily, someone has fixed this.
Still, the LEDs will glitch from time to time and I already broke one which I tapped a little to hard to see if there was a cold solder joint
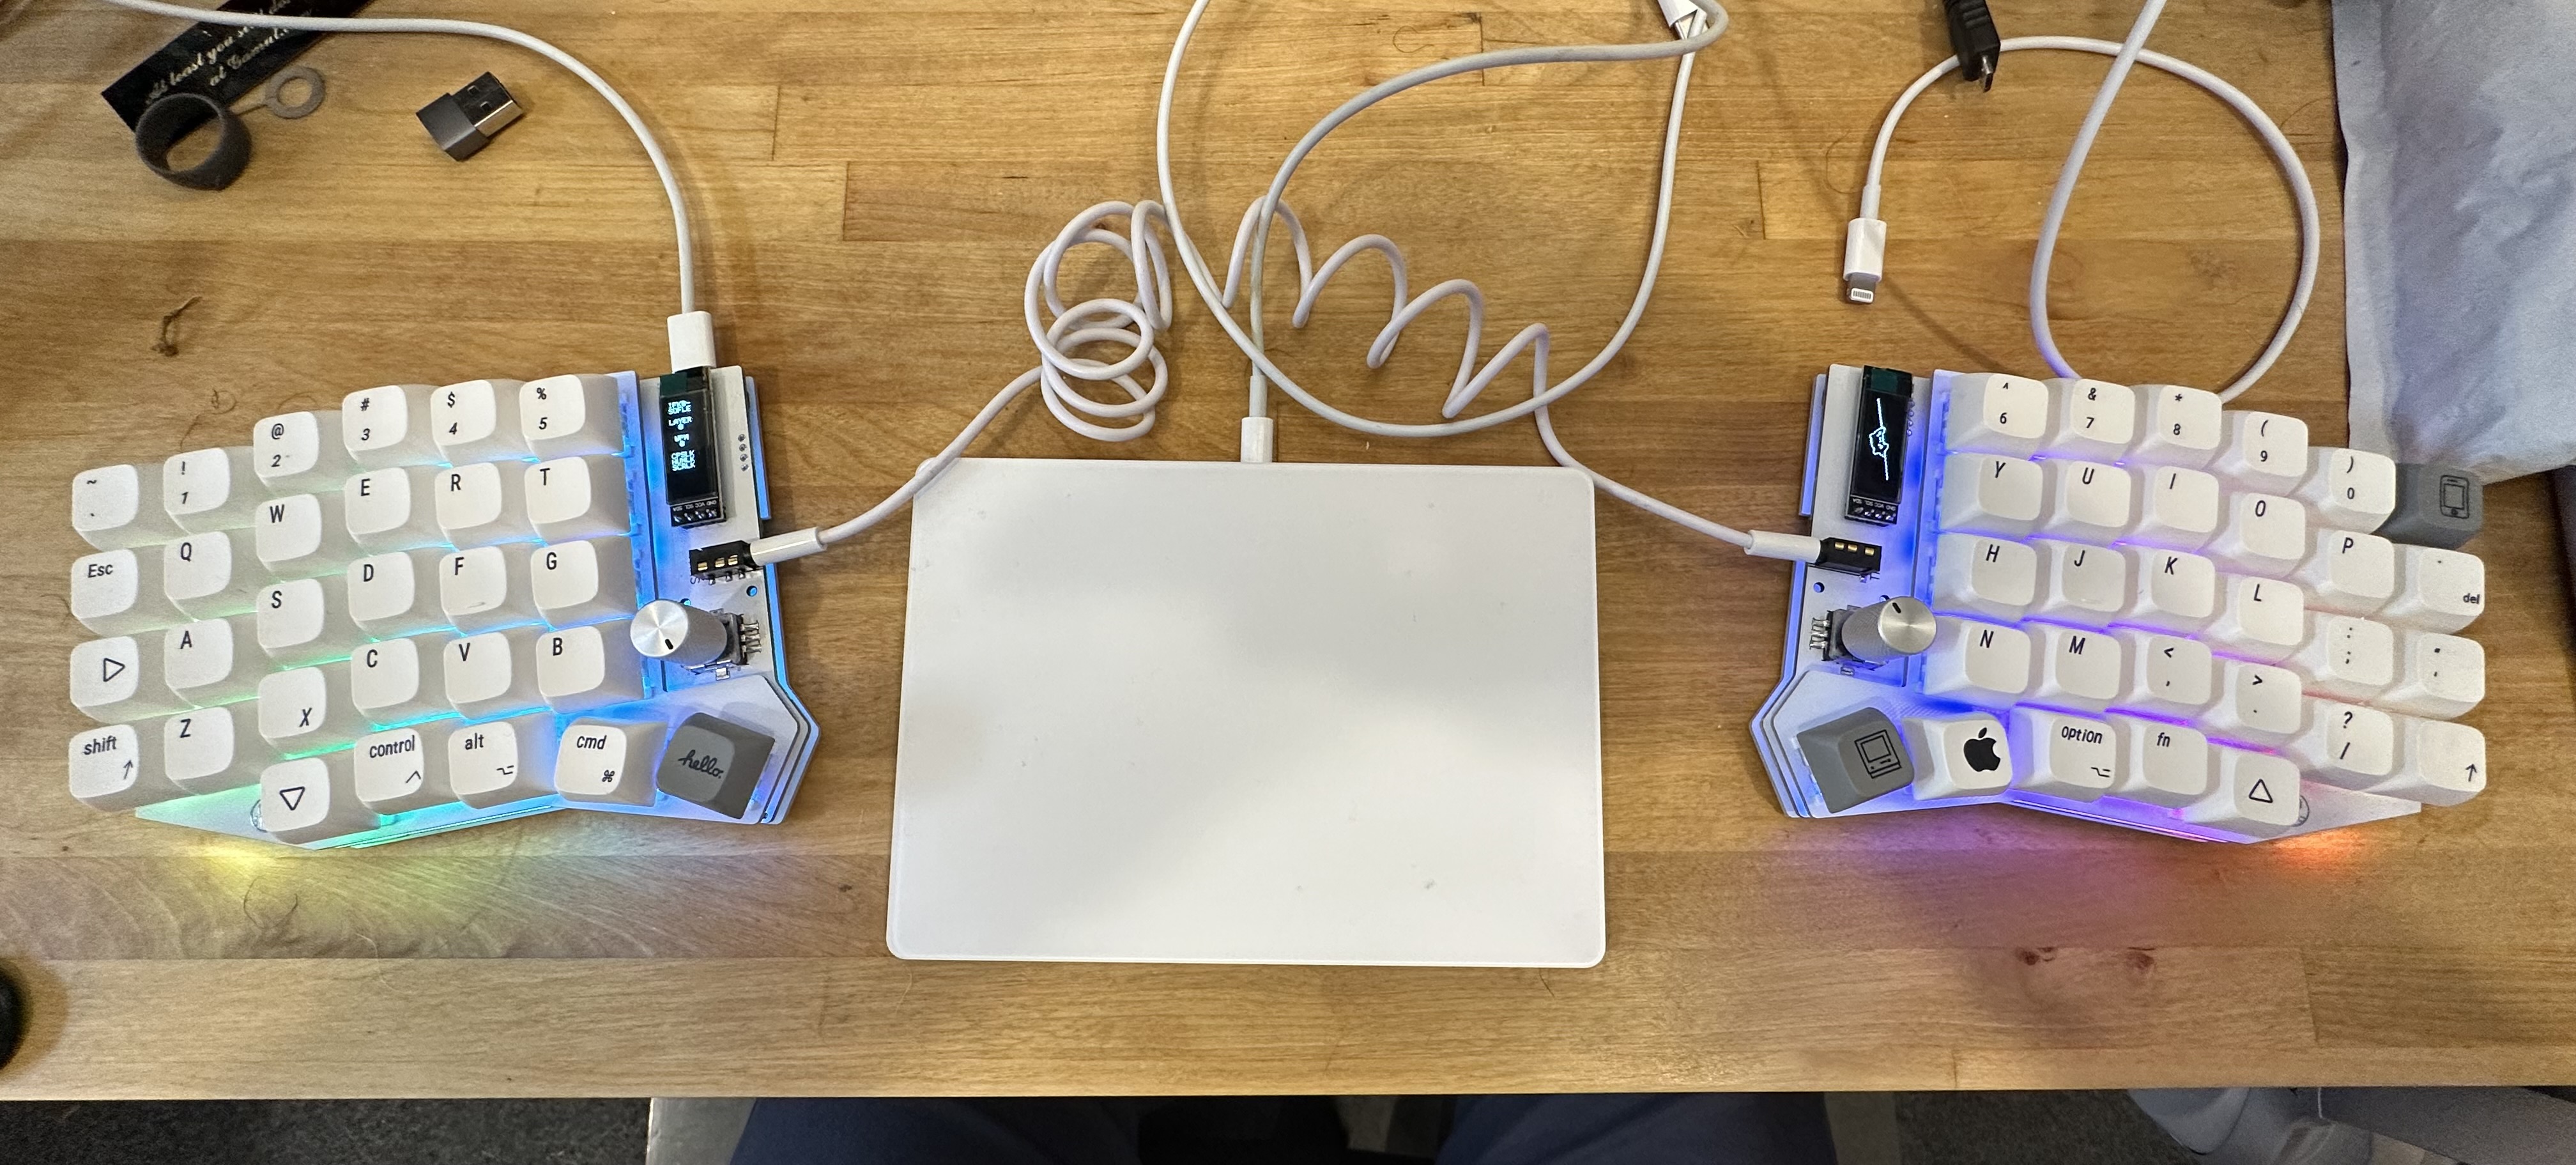
Nice Cozy Home
The last component was a case for it which I found on Thingiverse. I ordered the hardware from AliExpress and they came with the LEDs. I had to find some thread protectors at Home Depot to act as rubber feet for the adjustable hex screws on the bottom of the legs.
## All Done?

I’m pretty pleased with it! Sometimes the LED glitch out and, when the computer is asleep, I’ll come back to the keyboard jamming on the “V” and Enter key but I just unplug it and it’s fine when plugged back in. Maybe it’ll be fixed in the future.
It was a fun project that maddening with the LEDs but pretty rewarding overall.
I Built a Keyboard (Part 1)
Did You Know that I Can Solder?
It’s true. I’ve been doing it so long that I forget exactly when I picked up a soldering iron from Radio Shack but it was around the time that I owned an arcade game and needed to replace the capacitors on the monitor. This was circa 2005. I leveled up my skills by buying more and more arcade games, fixing them, and then eventually getting a job fixing arcade games.
Did You Know that I Play Guitar?
It’s true! I picked up my wife’s ignored acoustic Alvarez that was in the basement during a particularly stressful time at work and off I went. In order to let my fingers rest, I learned about the guitar effect pedal and that not only can you build pedals from kits but then buy broken ones and fix them. Fun! This required soldering. Lots and lots of soldering.
Did You Know that I Type on a Keyboard Roughly 40 a Week?
Also true! I used to use an Apple Wireless keyboard as it matched what was on the laptop. This made sense to me as was more mobile as a consultant and wanted to keep the experience as similar as possible whether or not I was at a desk.
Eventually, I moved on to the Microsoft Sculpt keyboard. It featured the same chicklet keys as the Apple keyboard but a slightly nicer form factor. I never used that keypad or mouse though. I’m sure they were great. Because this was a Microsoft product, I had to find a way to map the windows key to command and I had to use something called Karabiner-Elements to map those keys. I’d have to do this each time I get a new computer or whatever and it was super annoying.
Next up is the Freestyle2 Blue for Mac by Kinesis with the super big tenting kit. This was a mechanical keyboard that actually separated and took some time to get used to. They also give these out at my current employer to employees at the office. I used this so much that I found a non-functional one at my work and robbed the keys from it as I had worn the F and J key nubs off of them through use. It’s a good keyboard and allows you to connect to multiple devices which is nice since it’s Bluetooth and that process takes forever. Also, with the keyboard actually physically split, I was able to put the Apple Magic Trackpad between the two halves which was space-efficient.
That’s Nice. Didn’t You Build a Keyboard?
We’re getting there.
You can see, though, that there is an evolution happening here. It is getting farther apart and more and more nerdy. This comes into play because somewhere around the time I used that Microsoft Sculpt, I tried the Ergodox and hated it. It seemed complex for the sake of being complex but, as is human nature, sometimes we get bored with what works well and we want to make things harder than they need to be.
Prompted by seeing a friend post a picture of what seemed like a cool looking ergonomic split mechanical keyboard (with rotary encoders!). But, of course, it’s sold out and only 2 were made, etc…
Oh, hey! Here’s one! Close enough.
Trying to Buy a DIY Keyboard These Days
These keyboards, as far as I can tell, are passion project that are open-sourced which means that you could hand-forge the PCB yourself if you wanted to but, probably, you’ll be sending it to a PCB farm in China. This also means that the Bill of Materials (BOM) is maybe documented but not in a way that you can just add to cart at Gerber and be on your way. No, you have to go to Aliexpress and find the diode (hope it’s right!) and figure out the LED (better be the right size!). Then it will take somewhere around a month to show up.
Curiously, I found one on Aliexpress that was already assembled and ready to go. How bad could it be?
Keyboard (Number One)
A month later, I found out that it wasn’t too bad! In fact, it was pretty great!
All I had to do was plug in the switches and put on the keycaps and…
…one of the sockets ripped off the pad when the switch was inserted. Luckily, I know how to solder (see above) and was able to patch it.
In order to configure it, I had to use Vial which is an “open-source cross-platform (Windows, Linux and Mac) GUI and a QMK fork for configuring your keyboard in real time.”. We’ll talk about QMK in a bit but this program allowed me to change the keys and configure the lighting. Sounds good, let’s go.
Slowly Typing
This level of change with a keyboard is sort of like needing to learn how to type again. The B is not where you expect it so you reach for the backspace which is also not where you expect it. Then there’s the modifier keys which is kind of like the Shift key but instead of “a” turns into “A”, “n” turns into “[”. Supposedly, this let’s you keep your fingers closer to the home row. What I was interested in was those rotary encoders. Not only can you turn them but you can push them like a button. The left one could be volume up and down but then also mute. But what about that right one? I ended up using my most used Xcode shortcut for moving whole lines up and down. It’s also caps lock if you press it.
Based on the advice from others, I started slowly with 10 minutes more each day. It took about two weeks until I could code at a resonable pace. I still needed to look at the keys more than normal and I kept making mistakes but I was getting there.
With me feeling pretty confident, I did notice that when you unplugged the keyboard, it’d reset the lighting into a swirly rainbow each time I came back to it. I’d have to boot up VIAL and reset it. Since QMK is under this, I need to update QMK as maybe it was fixed. It turns out that I couldn’t. All of the documentation behind this keyboard said I needed to double-tap the reset button and I’d be able to upload new firmware. Here, instead, I got a drive mounted to my mac with some files on it that I was scared to touch. I messaged the vendor and they replied with: “Not suggest flash yourself”. I don’t know about you but I felt a little weird about a piece of hardware that I can’t update and could feasibly log my keystrokes.
This was compounded by the fact that, when I touched my microphone at my desk, I felt a static electric zap and then a column of keys stopped working. I tested all of the switches independently with no problem but, as the vendor admitted, it was probably something with the CPU on the keyboard. Unlike normal kits, though, this vendor made some changes and soldered the CPU right on the board so I couldn’t switch it out.
You Gotta Type
So, what did I do? Luckily, the vendor was gracious enough to have me send it back to China so they could fix it. But that’s nearly two months of not having the keyboard that I worked so hard to mold my fingers into a configuration. I guess it was time to actually build the keyboard like it should have been done. But where would I get the parts? How would really configuring it from scratch go? You’re just going to have to wait for Part 2.
Remember When?
For those of you who were using eBay around the year 2000 might remember, it was a major pain to sell things with pictures. Digital cameras weren’t mainstream (or cheap) and so if you needed to sell something but wanted to include pictures, you’d have to take the film photo, get it processed and printed. Then you’d have to get it scanned and saved on media like a CD-R. You’re not done there, eBay wasn’t in the hosting business so you’d have to find a place to host the images and then embed those file in the description using HTML.
Contrast that with today where you can create a listing directly on your phone and upload photos using cellular networks.
Object Capture
Introduced at WWDC 2021, Apple’s Object Capture, is a framework for the mac that allows you to input a collection of photos and output a .usdz 3D asset, complete with texture map. This framework uses photogrammetry in order to accomplish this. What is photogrammetry? If you have two eyes, you’re doing it right now. Your brain is taking two visual inputs and inferring dimensionality based on the difference between the two, in real time. In classic Apple fashion, they low-key announced this extremely impressive technology and then haven’t touched it since.
Before We Start, Some Limitations
Before we start with how to create a 3D asset, let’s explain some limitations. Object Capture, essentially, is guessing the 3D topography of the object based on the difference between visual markers. As far as I know, it is not using LiDAR hardware to it’s fullest. This means that the object you choose to capture should have easy-to-detect texture, be assymetrical, and not be either shiny or transparent. This makes sense, right? If you had something nearly transparent and symmetrical, how would you detect the differences in the surface texture? The shininess matters because if a hard light reflection follows the items everywhere, it is difficult to separate that from what you expect to be unique and consistent to the placement of the object.
Additionally, despite nearly every Apple device having the same processor across both phone, tablet, and laptop computers, this is only available for laptops and desktops, probably due to energy consumption considerations so you’re not doing this on your phone (yet) and any service that allows you to is taking the photos with your phone but then sending off to Mac somewhere else and running it there. It really is curious that they launched this as a framework and hoped that either someone independent would use it in a graphical mac app to create 3D assets or have a big hitter like Adobe integrate it into one of their apps.
How You Can Create a 3D Asset
Okay, knowing those limitations, try to pick something that fits the criteria. Choose a well-lit area with indirect light (think of a cloudy day outside vs. a spotlight shining brightly). I have found good success with a turntable but if you don’t want to spend that money, you can manually rotate the item with your hand or walk around the object but your milage may vary. Additionally, the less complicated the background the better but this isn’t absolutely crucial. If you go to the page for Object Capture, you can see some example images that show the environment and lighting that works best for the framework.
iPhone App
Apple says that you can use this framework with a DSL, drone, or Android phone but suggests using a dual-camera iPhone with LiDAR in order to generate high-fidelity images with a depth-map. Luckily, Apple also released sample code for an iPhone app that captures the correct data and exports what it calls gravity files. These files have the following format: -0.026483,-0.950554,-0.309428. This, I’m speculating, resembles the x,y,z coordinates of the phone.
Download the project, build, and run on your device after you wrestle with the provisioning profiles. The UI should resemble something like this:
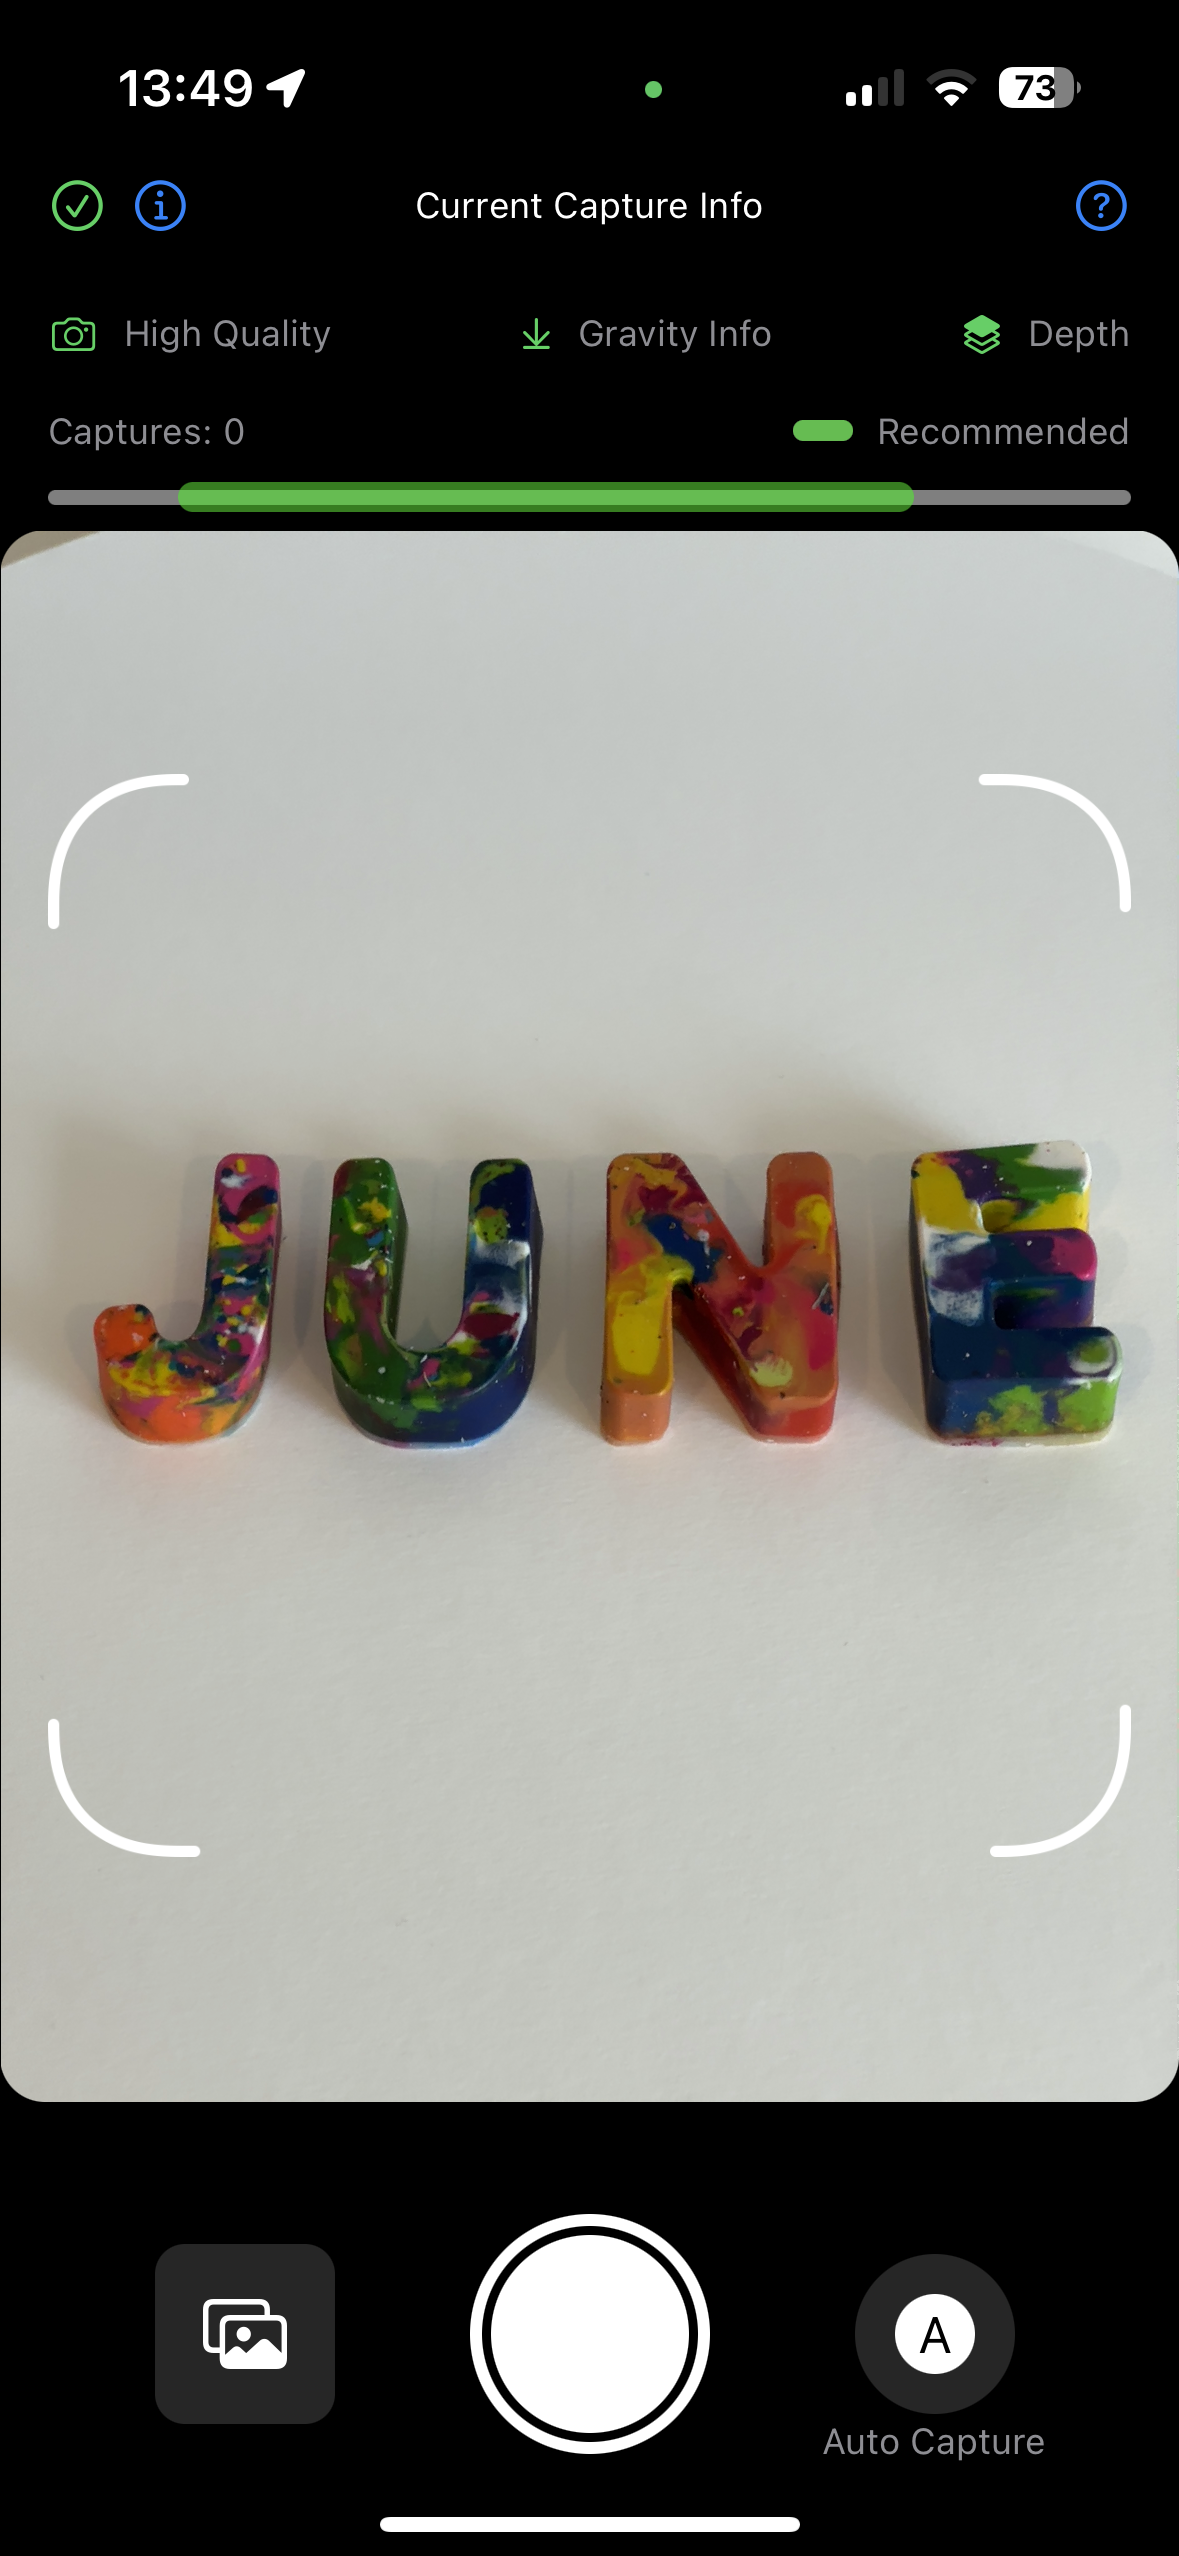
Using this app, you want to capture various angles of the item. All around, below, and above. I tend to shoot straight forward on the object while it rotates on a turntable. You don’t need a turntable; you can reach in and shift the object between shots. Once I have good coverage, I’ll flip it upside down and get a set of photos at around 45°, again all around the object. You’re aiming for over 40 photos here and the more the better.
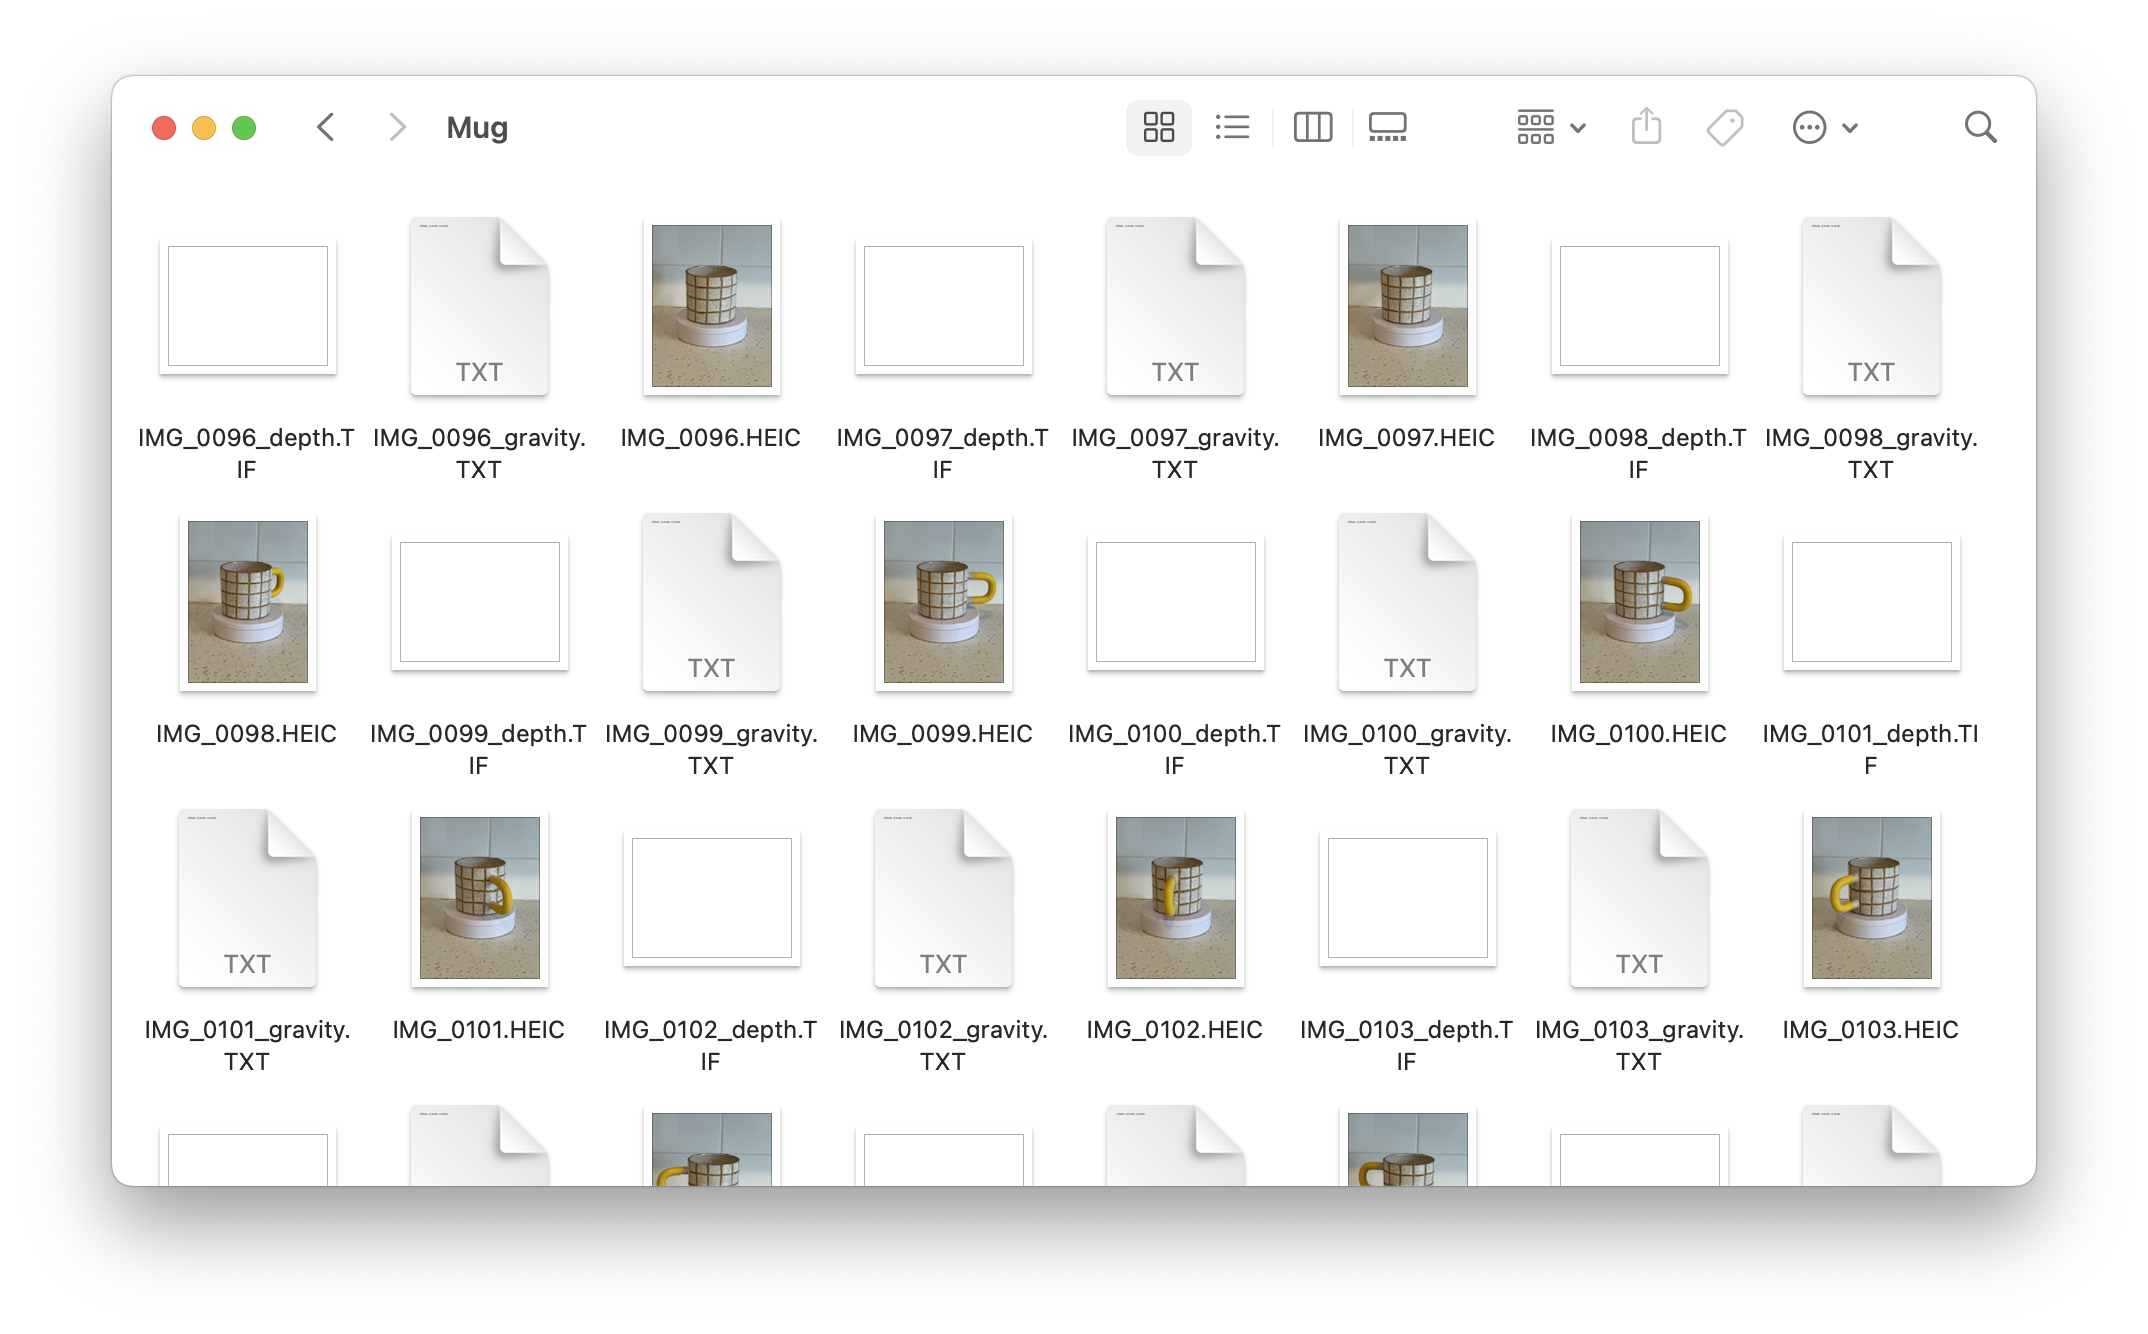
After you are done, hook your phone up to your mac and import the photos by going to Finder and selecting your phone. This is the old iTunes interface and you need to select the files tab. In the list should be the sample app and a folder named “Captures”. Drag that to your Desktop or wherever. Within this folder is a set of subfolders that contain your photos and the gravity files.
Mac Command Line App
Apple released the ability to convert those photos into 3D assets as library for MacOS meaning that it’s not an app like Reality Converter but intended for developers to create their own apps for importing and editing of the parameters for creation. If you want to skip having to download Apple’s source and running it through a command line application, there are plenty of apps on the Mac app store which are a GUI for this very functionality.
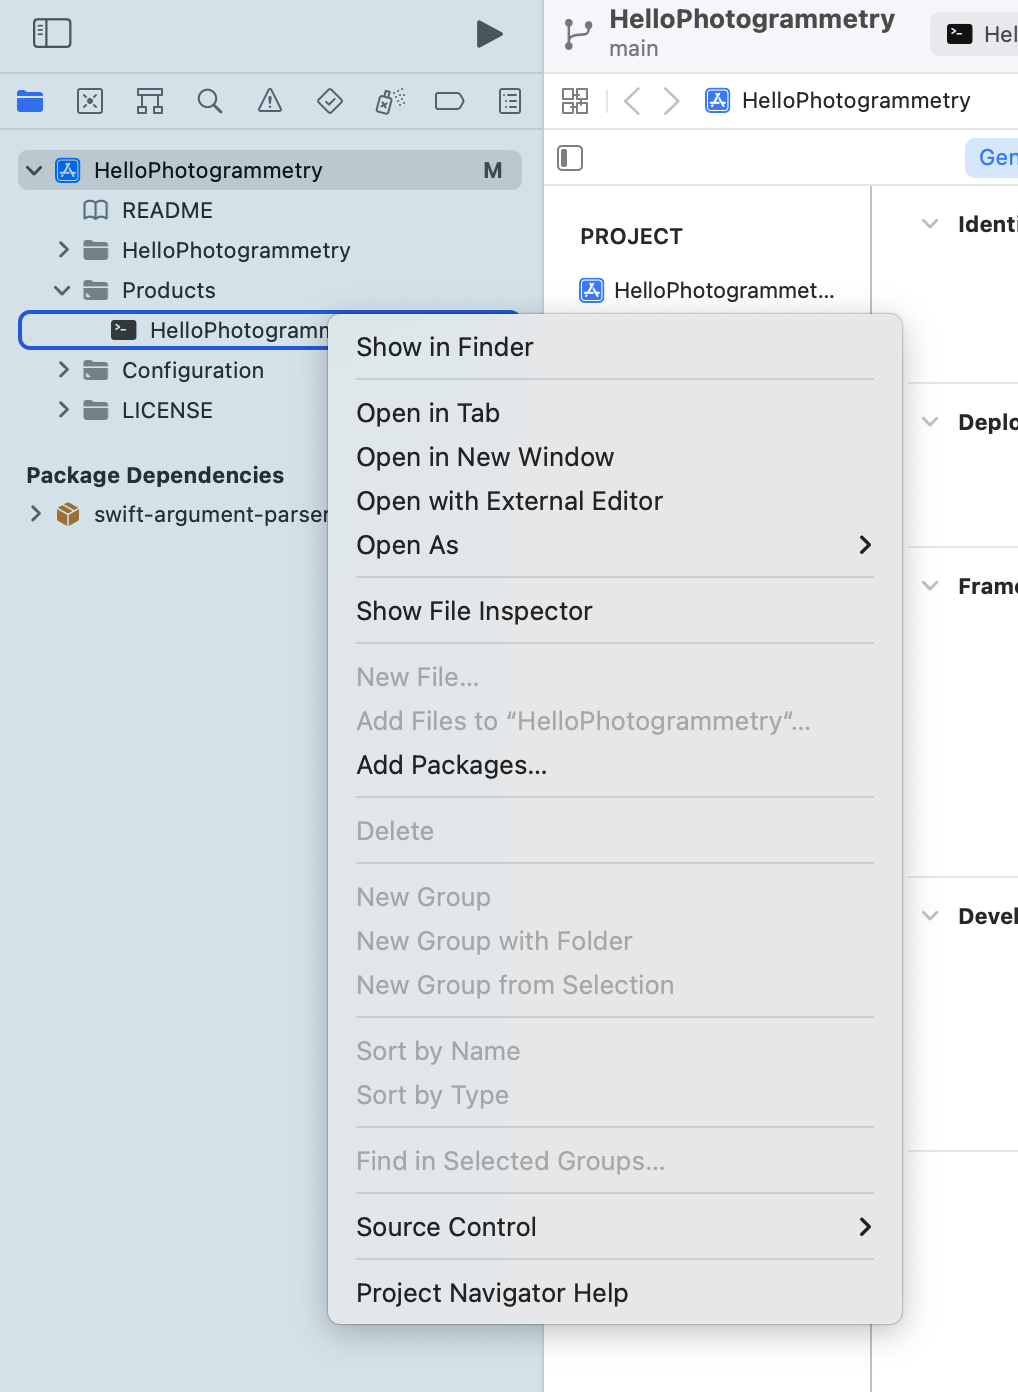
If you do want to forge forward, the source code is here. From here, build the app and get the app from under Products. ⌥ + click on the product to reveal in Finder and that’s your binary. Drag this into whatever folder you want to operate from.
Bringing It All Together
You have the photos and you have the command line mac app. It’s time to make a 3D asset. Navigate to your folder containing the mac command line application and your assets. You’ll need to type in ./HelloPhotogrammetry path/to/your/folder path/to/your/output/file.usdz. After a bit of time, you should have a file that resembles your object in real life.
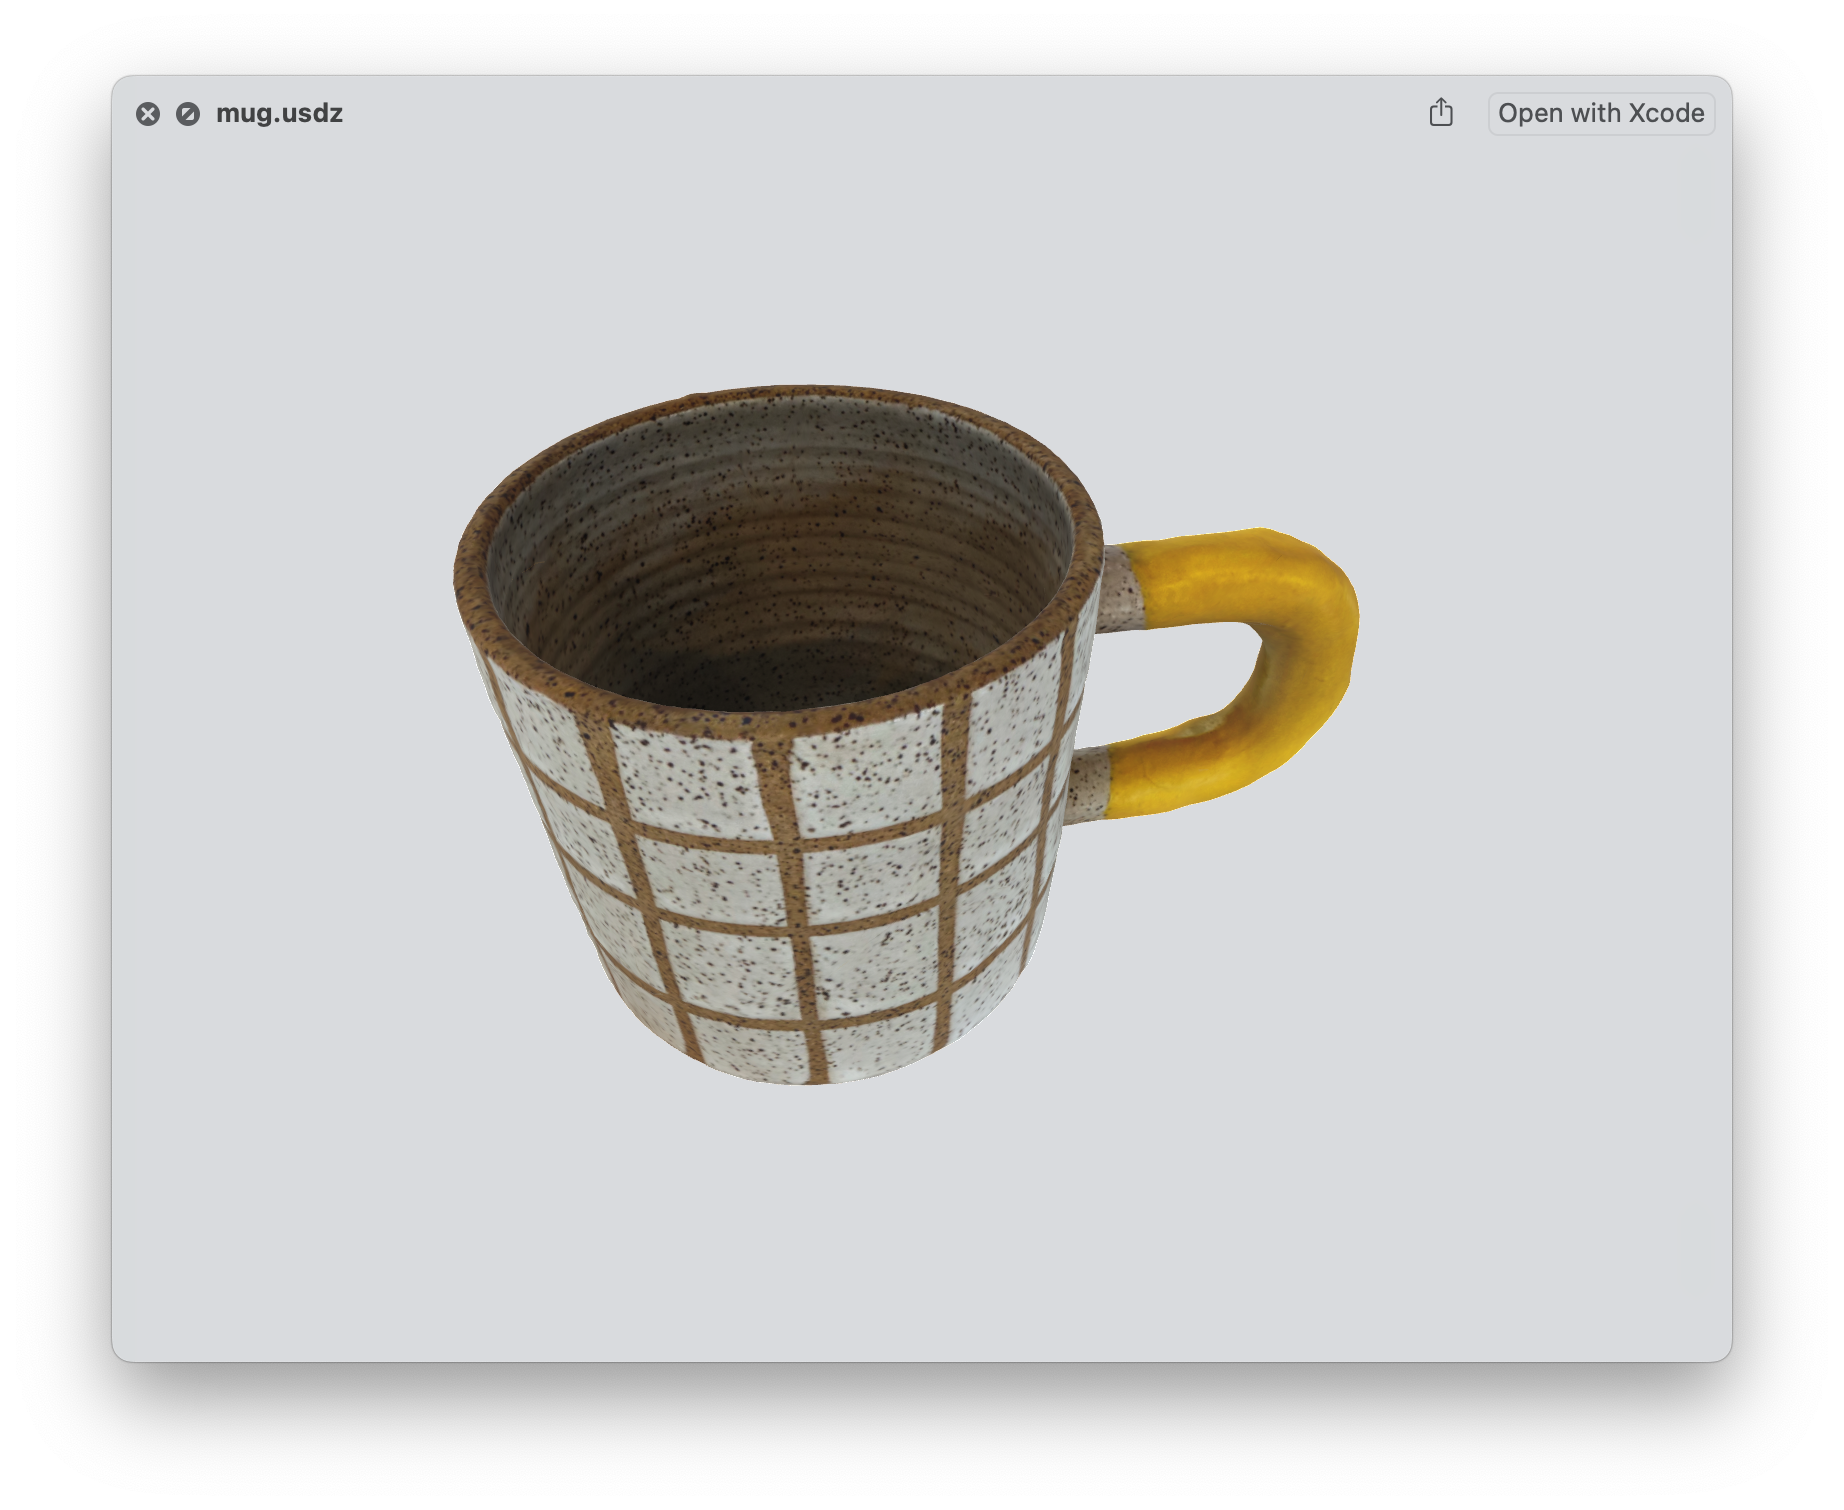
From here, you can use the asset in Xcode or send it to a friend via messages. iOS has native usdz viewing so it will display and even be placed in the user’s space when they open it.
Baby Steps
That was a lot of work and the process really becomes arduous if you were, let’s say, cataloging more than 5 items at a time. But this is the first step and it’s bound to get better. Increased utilization of hardware, more refined data, better image capture, etc… These are all reasons to believe that it’s going to get better from here.
What I’d like to see is this happening on mobile devices and with video buffer frames instead of photos taken at an interval but if you look forward to glasses or whatever, it’s a matter of time before it starts to get just as easy as snapping a photo with your phone is today.

Color Cubes and Lookup Tables
It has been over 10 years since I released PowerUp, an iOS app that converts and image to a pixelated version using a color pallet. Behind that was Core Image, iOS’ image processing framework. The pixelation part was easy but the color pallet part was tough. How on earth would you constrain a modern image using a certain set of colors?
Well, that’s what a Lookup Table (LUT) is for. In the simplest term, let’s say you have an image that is one color, solid red. If it was a RGBA image, the pixel would be comprised of values 255 (red), 0 (green), 0 (blue), 255 (alpha). Let’s say we wanted to change that to green, we’d pass a look up table that would instruct the GPU to replace all instances of (255, 0, 0, 255) with (0, 255, 0, 255). This is how they got Ryu into all those outfits.
Apple calls this a “Color Cube” for no good reason and you can utilize it in Core Image with CIColorCube. With super clear and instructive documentation, you feed this filter with the lookup table in the form of data. Data that is, “should be an array of texel values in 32-bit floating-point RGBA linear premultiplied format.”. EASY!
Back in 2012, Apple released a WWDC video outlining this with the example of a chroma keying. This was also before Swift so you could fudge a lot of things by throwing pixel component values into a block of memory allocated to be a char pointer of a certain size. That’s just what I did when I wrote InstaCube. The idea was that you’d apply a filter to the key image and then use that as a visual representation of the lookup table. Effectively, each pixel in the image you gave it was a set of values that Core Image would know the corresponding values to and replace it with.
Fast-forward to 2023. Remember, I’m writing an Instagram clone and Instagram has the ability to apply an uniform filter over an image. Sounds like a perfect case for our old friend Color Cube. But, that Objective-C and static library. That’s a “no go” with SwiftUI so let’s rewrite it.
Converting 10+ Year Old Code
The main sticking point was how to pull the data out of the image and convert it into data in the format that Core Image is expecting but what does that look like? After all, in Objective-C, just throw whatever it is into whatever you made. In Swift, that’s a no-no. You must know what you’re dealing with. In this case, I kept running into issues because the description above says “32-bit floating-point RGBA linear premultiplied format” so I assumed it needed to be an array of Float.
Getting the pixel data could be done a number of ways:
- Converting the image to a
cgImage and then using CGDataProvider
- Drawing the image into a
CIContext using a rendering method
- Creating a
CGContext, drawing into it, and getting the data
The first one does not work but the second two do. But after that, you’re given the super clear and not at all opaque UnsafeMutableRawPointer. It’s funny, even now I turn to Ray Wenderlich to explain things better than the docs can. Essentially, I needed to convert that to a UnsafeMutablePointer which would be typed. But which type? Remember, I thought it was a Float but, after much stabbing into the dark, it turned out to be UInt8 since the values are between 0 and 255. I was able to pull those values out as UnsafeMutablePointer has subscripting and it was as easy as calculating the image’s width * height * 4 with 4 representing R,G,B,A and, for each component pulling it out directly and storing into an array of UInt8.
But how to convert that to Data? We are dealing with value types and it seems totally not able but it’s a matter of throwing a & infront of the collection and using NSData(bytes: length:).
Whew.
The result is here but there was one more sticking point. No matter what I tried, the result wasn’t right. It was slightly too dark. It turns out that Apple released CIColorCubeWithColorSpace which takes into consideration the slight differences in how images are processed. It’s just a matter of making sure that the images, context, and color cube are all using the same color space and it works!
Instagram has turned into a festering pit of gross. A stream of gross, unrelated videos and ads. The solution is built on a protocol born from another service going gross, Mastodon. PixelFed is what Instagram was before it got gross.
I thought it’d be interesting to try to write a client for iOS using only SwiftUI. This is an act of futility as there’s already a client out there but it’s a good way to try to learn.
Like I said, Pixelfed is based on Mastodon so I’m using MastodonKit to get a jumpstart. It works pretty well despite being largely neglected.
Signing In
Okay, to the meat of this post. Mastodon uses OAuth 2.0 for authorization which has it’s own flow. The gist of it is that you request authorization from the service with the client id and secret. Good so far. But then to get the token for subsequent requests back, you need to provide an endpoint URI (redirect URI) to send the token back to.
What? Sir? This is an app.
TL;DR:
Open a web view that points to https://<your instance>/oauth/authorize with the url parameters needed. Use func webView(_ webView: WKWebView, decidePolicyFor navigationAction: WKNavigationAction) async -> WKNavigationActionPolicy to pull out the code and then use that for an API call to POST /oauth/token in order to get the API token.
The Nitty Gritty
First, Getting that Client ID and Secret
Mastodon has this part of the API but I was able to also get it from Pixelfed itself. It’s as simple as making that call and getting back the id and secret. This is a pretty snazzy part of Mastodon as it allows one user to just state what instance they want to point to and the client should be able to register for API access on the fly.
Stabbing in the Dark
Remember how I said that MastodonKit is outdated? It has a function that allows you to sign in using username and password. I first tried that and got an error saying the client was invalid. I double-check and re-registered my app to no avail.
Looking at the Mastodon docs, I see two different things. The first says to make an API call using the client id, secret, redirect uri, and grant type of client to receive a Token entity. This sounds exactly like what I want but how does it know which user it is? If you read closely, you’ll see “We are requesting a grant_type of client_credentials, which defaults to giving us the read scope.“. I want both read and write so that won’t work.
Redirected Around and Around
Digging deeper, I see there is a whole flow to this, starting with this call to GET /oauth/authorize HTTP/1.1. Passing the arguments of client id and secret, how you want the code back, redirect_uri, and grant permissions, you’ll get the token back but read closely: “The authorization code will be returned as a query parameter named code.” as in redirect_uri?code=qDFUEaYrRK5c-HNmTCJbAzazwLRInJ7VHFat0wcMgCU.
That’s not a Token entity. It’s a code that you need to use for a second call (more on that later). You’ll note that MastodonKit doesn’t have this network call. Is it because it used to use the username/password combo before and now Mastodon uses something different and it’s just not updated?
So, I roll my own request with all the pertinent information and I get back data that is HTML? Looking back at that documentation for the call, I see “Displays an authorization form to the user. If approved, it will create and return an authorization code, then redirect to the desired redirect_uri, or show the authorization code if urn:ietf:wg:oauth:2.0:oob was requested.”. So, what do I do here?
Completely Wrong
I took that data and displayed it on a WKWebView. As long as I set the base url when loading the data to pixelfed.social, it looked just fine! Maybe, when you POST the form data, it will authenticate with the server and redirect to the uri you specified. Reading up on that, WKWebViewDelegate has a callback function (func webView(_ webView: WKWebView, decidePolicyFor navigationAction: WKNavigationAction) async -> WKNavigationActionPolicy) to make sure it’s okay to redirect. You should be able to pull the code from there. But when I went to authenticate, it would return a 419 error and I wouldn’t get any redirect. What’s worse is that sometimes it would log me in and go straight to the website. Close but not what I wanted.
Maybe I need to set the redirect_uri to urn:ietf:wg:oauth:2.0:oob. Does that do anything, nope. The HTML has a token in there. Is that it? Nope. Looking at the request that is made by the form, I see it’s passing the username, password, and that token but nothing else.
Here’s the Answer
Let’s go back to the documentation. What’s maddening about this is that it looks like every other API call but it is not an API call. There is no blinking red text that it is a good ol’ URL. What I had to do is have the WKWebView load the URL of https://pixelfed.social/oauth/authorize with the URL query parameters of response_type, client_id, redirect_uri, and scope. For the redirect_uri, I made something up of my apps name as the scheme and auth as the host, e.g., mycoolapp://auth. The user signs in and then within func webView(_ webView: WKWebView, decidePolicyFor navigationAction: WKNavigationAction) async -> WKNavigationActionPolicy, you check the navigationAction.request.url to see if it has a query parameter of code. This is your code not your token.
From there, you make a call to POST /oauth/token with the parameters of the code you just got along with grant_type, client_id, client_secret, and redirect_uri using the MastodonKit function. Finally, you get the Token entity that you can use to authenticate network calls.
From there, store that into the keychain and be on your way!
Overview
Augmented Reality is a burgeoning field of technology due to a myriad of factors: shrinking devices, ever-improving spacially-aware hardware, machine learning and image recognition improvements, and improving cellular networks.
Apple has been making a big push into this realm since iOS 11 when ARKit was introduced. Slowly improving it in the last five years, Apple started with support for gaming engines such as Unity and Unreal along with their own 3D API, SceneKit. With iOS 13, Apple introduced an API to assist with the creation and display of augmented reality content with RealityKit.
Let’s say that you’re excited about augmented reality and you want to make your first app. When you launch Xcode and click on “New Project”, you can select an augmented reality app template. Great! But after you do the difficult part of selecting a name, you’re presented with a dropdown that allows you to select which technology to use: RealityKit, SceneKit, SpriteKit (Apple’s 2D gaming API), or Metal (Apple’s OpenGL replacement). We aren’t going to use strictly 2D sprites and we don’t need to drop down to Metal. That leaves us with RealityKit and SceneKit.
But what’s the difference between SceneKit and RealityKit if they both use ARKit?
For this blog entry, I’m going to present the Utah Teapot in an ARKit view using both technologies. The code is here but I’ll be showing what it takes to get the .obj file into the app and presented. Once I got it presented, you can see there are some differences in how they appear.
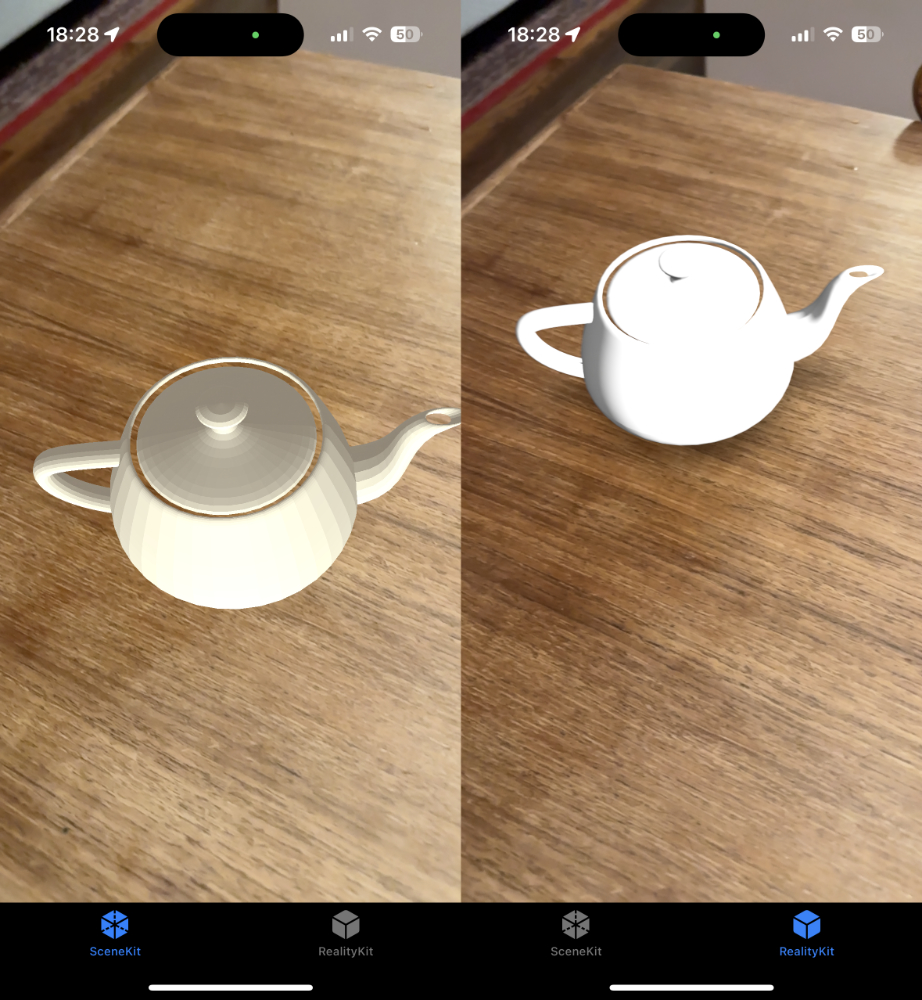
In future entries I’ll try to do some typical things like animations and interaction in order to contrast the two frameworks with the pros and cons for each one along the way.
SceneKit
The Canvas
For SceneKit, we need to utilize ARSCNView. It is a subclass of he SCNView has 3D-specific functions/properties like if it should render continuously. That being said, it has AR-specific properties and features for raycast queries and planes. Most importantly, it has an ARSession property that you need to configure and start:
sceneView.session.delegate = self
let configuration = ARWorldTrackingConfiguration()
configuration.planeDetection = [.horizontal]
sceneView.session.run(configuration, options: [.resetTracking, .removeExistingAnchors])
At this point, it will start looking for horizontal planes. Once it finds one, the ARSessionDelegate method will be called to let you know that an anchor has been found. We need to make sure it’s a plane. It is here that we can place an object. I’ll show that after we define how to get the asset.
The Asset
Getting the teapot into the project was as simple as adding the .obj file to the bundle. In order to utilize the 3D asset, it was as simple as the following code.
let scene = try? SCNScene(url: urlOfFile)
let asset = scene?.rootNode.childNodes.first
After the session finds a plane in the delegate function func session(_ session: ARSession, didAdd anchors: [ARAnchor]), it’s a matter of using the transform (location, scale, rotation) of the anchor for the position of the asset and then placing it into the ARView’s scene.
func session(_ session: ARSession, didAdd anchors: [ARAnchor]) {
    guard
        let planeAnchor = anchors.first(where: { $0 is ARPlaneAnchor }) as? ARPlaneAnchor,
        let asset = asset,
        asset.parent == nil else { return }
    asset.simdPosition = planeAnchor.transform.translation
    sceneView.scene.rootNode.addChildNode(asset)
}
RealityKit
The Canvas
RealityKit uses an ARView which looks very similar to ARSCNView but they are similar but not related. What’s similar is that they both have an ARSession that you need to configure the same way shown before. Again, you can use the ARSessionDelegate in order to detect when a plane is found. Here is where the similarity between SceneKit and RealityKit end, though.
The Asset
Right off the bat, it is not possible to load the .obj file within RealityKit. Only USD files (.usd, .usda, .usdc, .usdz) and Reality files (.reality) are supported. As a result, you need to convert it to one of those formats using a program provided by Apple called Reality Converter. Thankfully, this is as easy as dragging and dropping a file into the window and exporting as a .usdz format. But, what if your 3D asset workflow doesn’t use USD? You can use Pixar’s USDZ command line tool to convert.
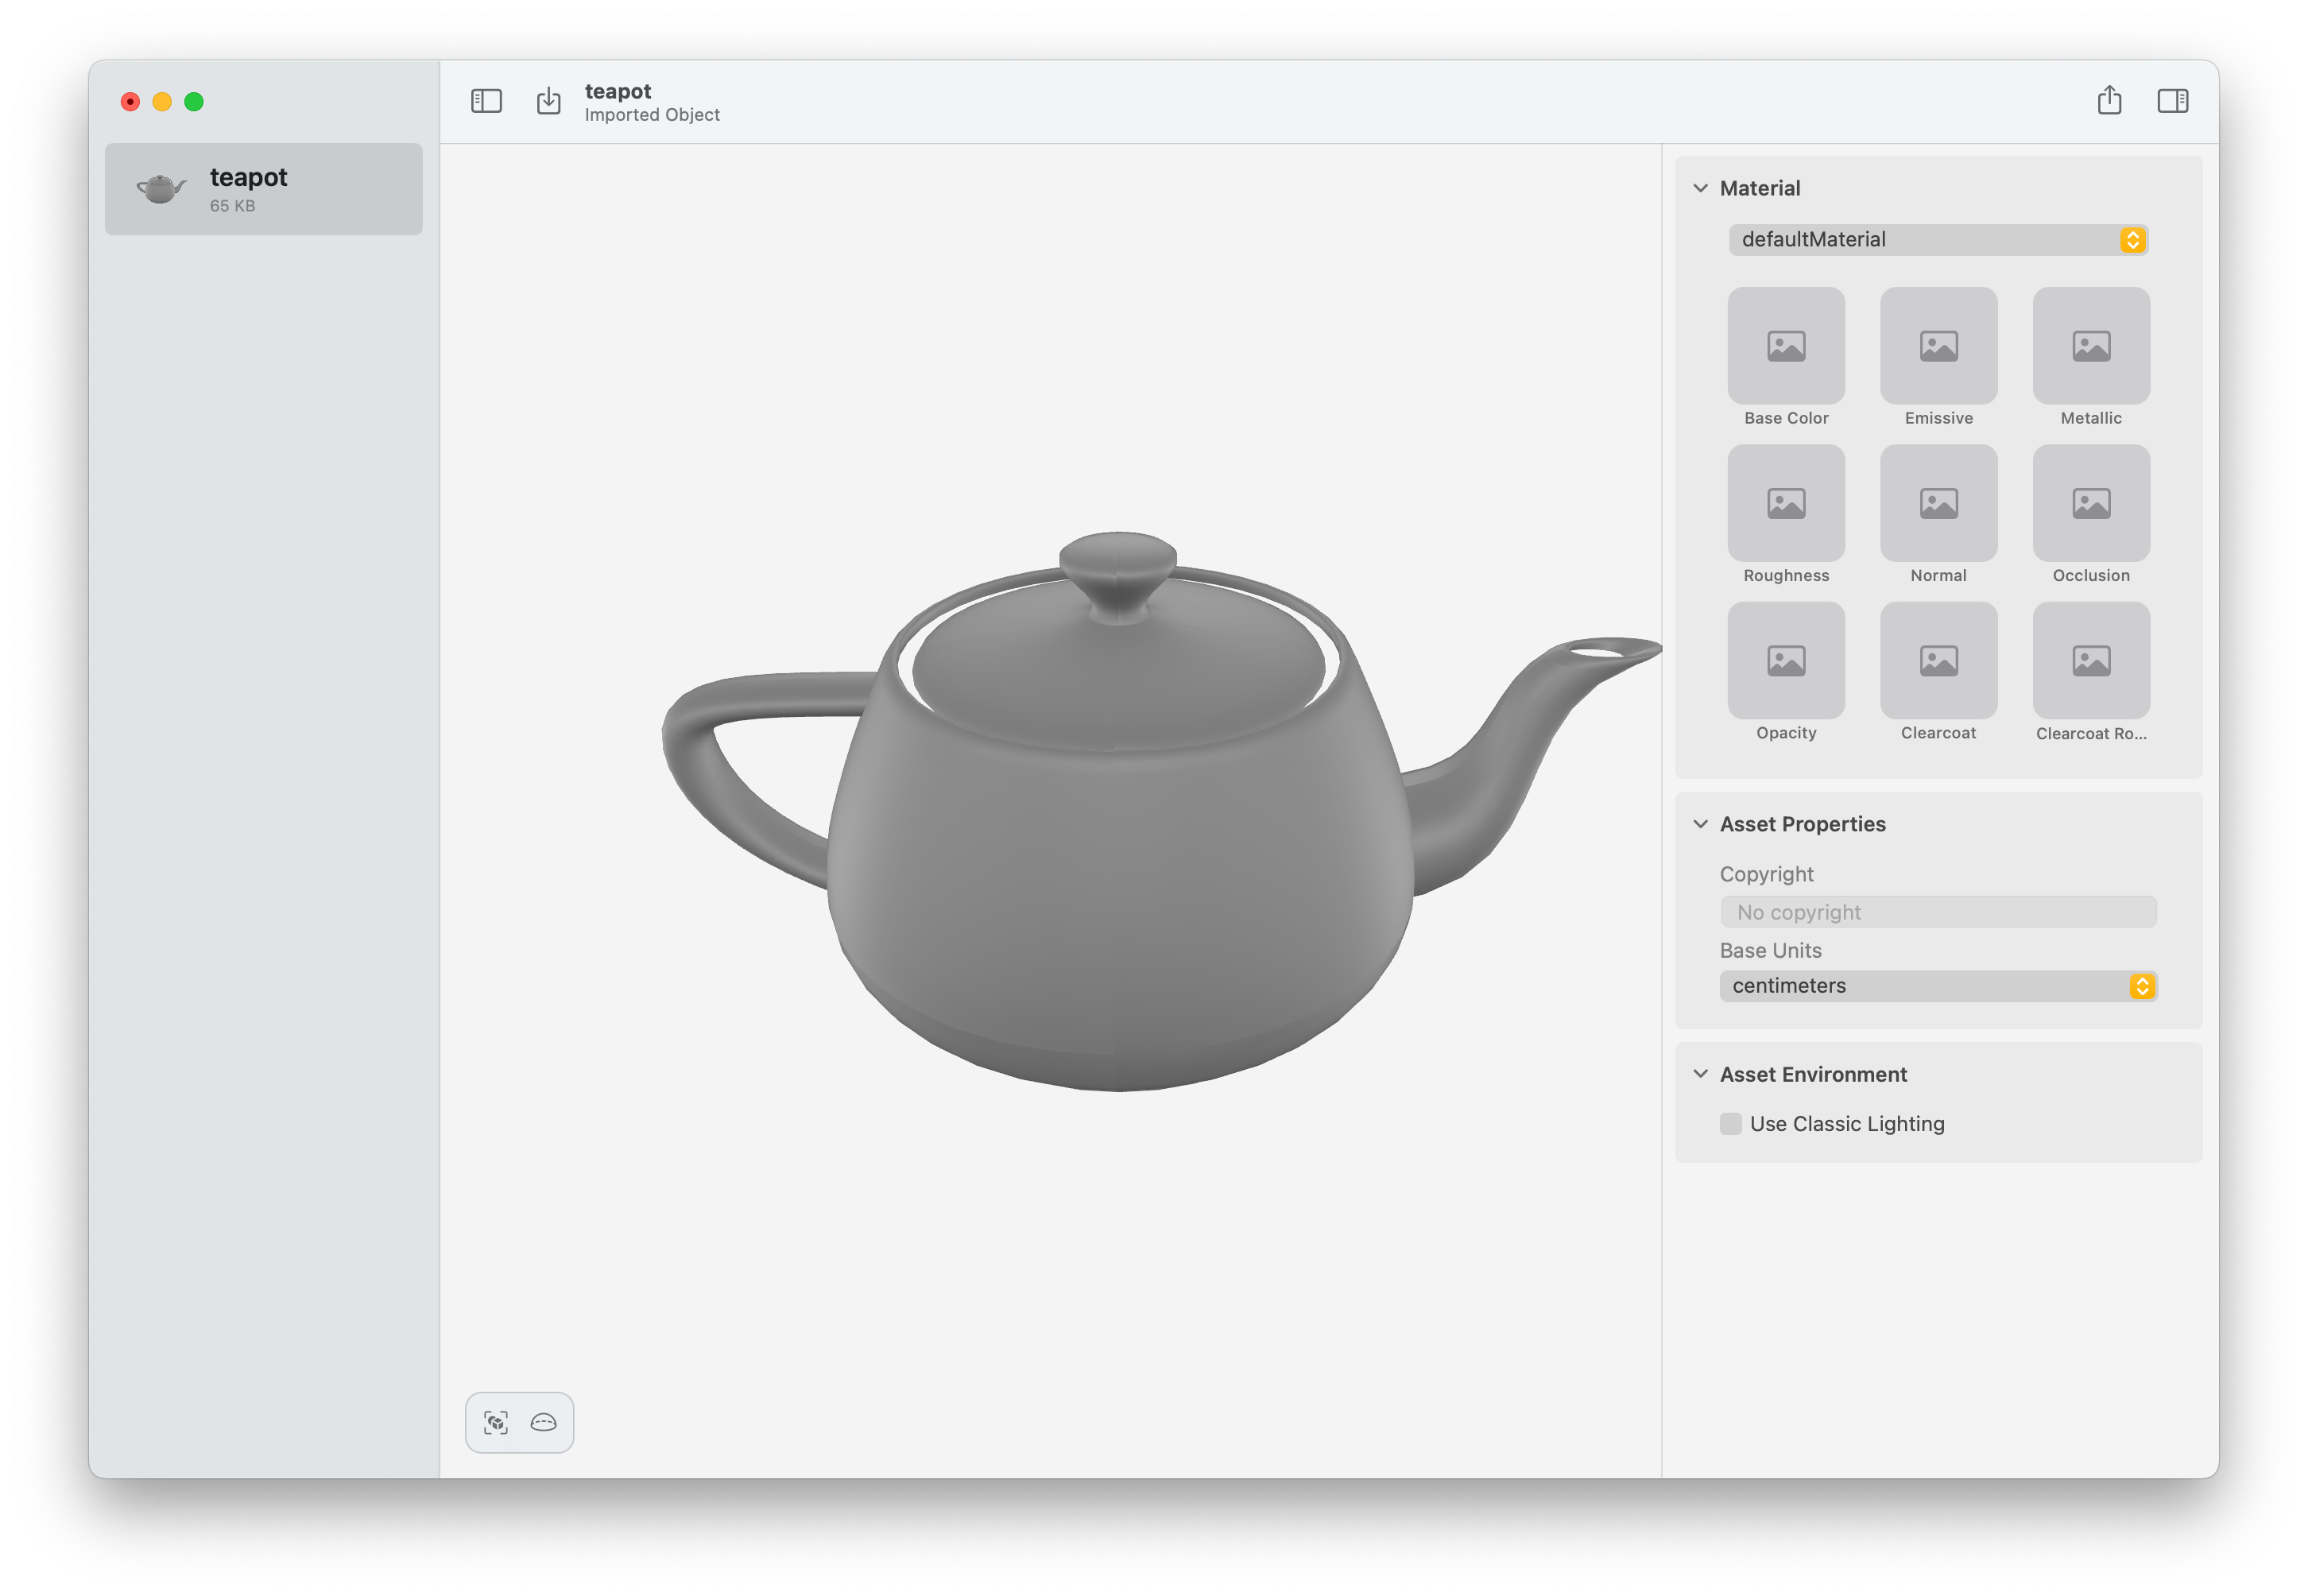
Getting the asset to load can be done in an asynchronous manner (yay!) using Combine (ugh.).
        let url = URL(filePath: path)
        let _ = Entity.loadAsync(contentsOf: url)
            .sink { response in
                switch response {
                case .failure(let error):
                    print(error)
                case .finished:
                    print("done!")
                }
            } receiveValue: { entity in
                self.asset = entity
                self.asset?.scale = SIMD3(x: 0.03, y: 0.03, z: 0.03)
            }
            .store(in: &cancellable)
As super-complete documentation says An entity represents ‘something’ in a scene.. This is the base object of many types we’ll use in RealityKit including, AnchorEntity, ModelEntity, lights, and camera.
Again, we use the session delegate function when the session finds a plane. But unlike before, we don’t translate the asset using the planes transform, instead we create an EntityAnchor by initializing with the plane anchor. We add our asset to that AnchorEntity and it presents it after we add the anchor to the scene.
    func session(_ session: ARSession, didAdd anchors: [ARAnchor]) {
        guard let planeAnchor = anchors.first(where: { $0 is ARPlaneAnchor }) as? ARPlaneAnchor,
              let asset = self.asset,
        asset.parent == nil else { return }
        let anchor = AnchorEntity(anchor: planeAnchor)
        anchor.addChild(asset)
        anchor.addChild(light)
        self.arView.scene.addAnchor(anchor)
    }
In Conclusion
This is merely scratching the surface of what’s possible. We simply imported an existing model and placed it in the user’s environment. But what about interactions? Animations? Physics? Lighting? I’m going to try to dive into these aspects of augmented reality on iOS to show how they can be accomplished on RealityKit at the very least but may need to contrast vs. SceneKit.
Backstory
I was there at WWDC 12 when they announced collection views and the crowd was simultaneously impressed that they wrote such a flexible user interface element that was similar to the extensively used table view. But, that was ten years ago.
Since then, Apple has worked to smooth away some of the larger issues that have cropped up in the countless apps that have used a collection to show a list/grid on the screen, mainly:
- Autolayout and dynamic content is now a thing and static, predefined sizes aren’t really relevant anymore.
- There are a slew of crashes related maintaining a source of truth behind the list/grid.
To answer these issues, Apple introduced UICollectionViewCompositionalLayout and UICollectionViewDiffableDataSource.
Lately…
I’ve had to set up a couple UICollectionViews using these two tools and I’ve learned a couple patterns that make organization of the code such that I can keep track of what’s important. Here are a couple of tips that I find using a UICollectionView much easier.
Here is the collection view I made as the example:
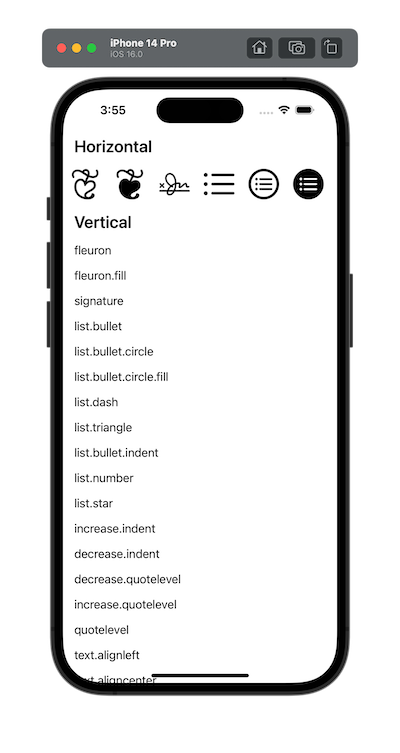
You can download the sample code here to see how it comes together.
typealias
Modern collection views utilize Swift Generics and that’s great! It makes it automatically cast what type of model or view that you’re using when defining behavior. The problem is that littered throughout your code is UICollectionView.CellRegistration<Cell, Item> or UICollectionViewDiffableDataSource<Section, Item> which is verbose and can get repetitive. As a result, at the top of the file, I’ll get this out of the way:
    typealias DiffableDataSource = UICollectionViewDiffableDataSource<Section, Item>
    typealias Snapshot = NSDiffableDataSourceSnapshot<Section, Item>
    typealias ImageCellRegistration = UICollectionView.CellRegistration<SymbolImageCell, Item>
    typealias TextCellRegistration = UICollectionView.CellRegistration<SymbolTextCell, Item>
    typealias HeaderRegistration = UICollectionView.SupplementaryRegistration<SymbolHeader>
    typealias CellProvider = DiffableDataSource.CellProvider
    typealias HeaderProvider = DiffableDataSource.SupplementaryViewProvider
In usage, I can just write:
    let imageCellRegistration = ImageCellRegistration { cell, indexPath, item in
        cell.loadItem(item)
    }
Instead of:
    let imageCellRegistration = UICollectionView.CellRegistration<SymbolImageCell, Item> { cell, indexPath, item in
        cell.loadItem(item)
    }
One goes off the page and the other doesn’t but they still work the same and convey usage.
Section and Item
Right off the bat, I define the sections that the compose the collection view along with a struct that holds the underlying objects.
Section
In the past, you might have an enum that is backed by an integer that gives and idea of what you might be displaying. This makes it easier to suss out what indexPath.section might be, right? After all, it is more clear that indexPath.section == Section.Horizontal.rawValue() is for the horizontal section than indexPath.section == 0, right? But you still get into a situation where you might not want to show the section and it becomes an exercise in maintaining what is expected versus what is really there with somthing like indexPath.section == Section.Horizontal.rawValue() && horizontalIsShowing(). This gets ever more complicated if things show up in a different order or if you have more than two sections.
Here are two things I do to do away with that. First, define just a plain enum that conforms to Hashable.
    enum Section: Hashable {
        case Horizontal
        case Vertical
    }
Then, when you need to know what section you’re dealing with, UICollectionViewDiffableDataSource conveniently has @MainActor func sectionIdentifier(for index: Int) -> SectionIdentifierType?.
In usage, this means that when the data source or compositional layout need to know what cell or layout, respectively, to give for each section, it’s no longer tied to a particular indexPath.section value. In code, it is as easy as:
    guard let diffableDataSource = collectionView.dataSource as? DiffableDataSource,
          let section = diffableDataSource.sectionIdentifier(for: indexPath.section) else { return nil }
Note, that section might not even be there. The data source could be empty and there might not be one but modern collection view APIs allow for nil to be returned. That being said, you can now use that section as an enum with a switch statement.
    switch section {
    case .Horizontal:
        return collectionView.dequeueConfiguredReusableCell(using: imageCellRegistration, for: indexPath, item: item)
    case .Vertical:
        return collectionView.dequeueConfiguredReusableCell(using: textCellRegistration, for: indexPath, item: item)
    }
Item
Diffable Data Sources really want homogenous types within them. From watching WWDC videos, it seems like Apple prefers that item identifier to be the unique identifier for your backing model object. In theory, this might be the same identifier that your server uses for your object, right? What I have encountered is that if that identifier is the same despite the object being different, you get into trouble. In other words, if you have an Author with id that is 1 and a Book with id that is 1, the diffable data source is going to complain.
As a result, I tend to set up a struct that has an id which is an UUID.
    struct Item: Hashable {
        let id: UUID = UUID()
        let symbol: String
    }
No likely chance of collision there. I will then store my object directly in that struct. This might go against what Apple suggests but now I don’t have to have a corresponding collection to look up whenever I need to access it, it is right there and I don’t have two things to keep track of. Usage:
    let textCellRegistration = TextCellRegistration { cell, indexPath, item in
        cell.loadItem(item)
    }
The Item is simply a wrapper with a UUID.
Cells Define Layout
To recap, a compositional layout is comprised of a section that may use a group that may use one or more items.
My last tip to when defining the compositional layout, I tend to move what I can to describe the presentation to the cell itself for reuse. Because I may want to present the cell elsewhere, I move the creation of any one of those elements (section, group, item) to the cell for use elsewhere. After all, the cell probably knows how it wants to be presented, right?
In usage:
    let item: NSCollectionLayoutItem
    if sectionIdentifier == .Horizontal {
        item = SymbolImageCell.compositionLayoutItem()
    } else { // .Vertical
        item = SymbolTextCell.compositionLayoutItem(withinEnvironment: environment)
    }
    let group = NSCollectionLayoutGroup.horizontal(layoutSize: item.layoutSize, subitems: [item])
    let section = NSCollectionLayoutSection(group: group)
    section.boundarySupplementaryItems = [self.headerItem(forEnvironment: environment)]
    section.orthogonalScrollingBehavior = sectionIdentifier == .Horizontal ? .continuousGroupLeadingBoundary : .none
     return section
See how the items are defined by the cell itself? That code can be utilized wherever the cell is presented which I’ve had to do before.
In Summary
I’m happy to see that many of the rough edges from collection views have been resolved. Many issues with updating the collections backing them have been resolved and layout has been consolidated into a sane, logical place.
If I missed anything or if you have your way of handling collection views you like, feel free to reach out.
SwiftUI in Cells
Since SwiftUI was introduced, I’ve found myself wading into the new way of working and then quickly running back as soon as I encounter the need to navigate anywhere within the app using the framework’s confusing and limited navigation paradigm. It works great if you’re tapping on a cell and pushing to a detail view but anything greater, let’s say a multi-step process with diverse model types, and it falls apart.
But, this is way of the future! So, while Apple tries to iron out that whole ball of wax, what’s the easiest, low-cost way to try SwiftUI out?
I have found that in iOS 16, using UIHostingConfiguration on UICollectionViewCell or UITableViewCell provides a nice, light way to do in less lines of code what UIKit can achieve.
Here’s a clear-cut example of how to use it.
class SymbolCell: UICollectionViewCell {  // 1
    func load(symbolNameString: String, state: UICellConfigurationState) {  // 2
        self.contentConfiguration = UIHostingConfiguration(content: { // 3
            HStack(spacing: 12.0) {
                Image(systemName: symbolNameString)
                    .resizable()
                    .scaledToFit()
                    .frame(width: 44.0, height: 44.0)
                    .foregroundColor(state.isSelected ? .red : .black)
                Text(symbolNameString)
                    .font(.body)
                    .foregroundColor(state.isSelected ? .red : .black)
                Spacer()
            }
        })
    }
}
I’ll outline the various points here:
- I have a subclass of
UICollectionViewCell. Pretty standard stuff.
- I like to load my cells with a model object, in this case a string, with a function that I call when I dequeue the cell or set up the cell provider.
- Here is where the magic happens. I set the cell’s content configuration using
UIHostingConfiguration with the initializer that takes in content. It is here that I can easily set up an image, text, and align left.
And that’s it! No autolayout or setting up state.
The result is
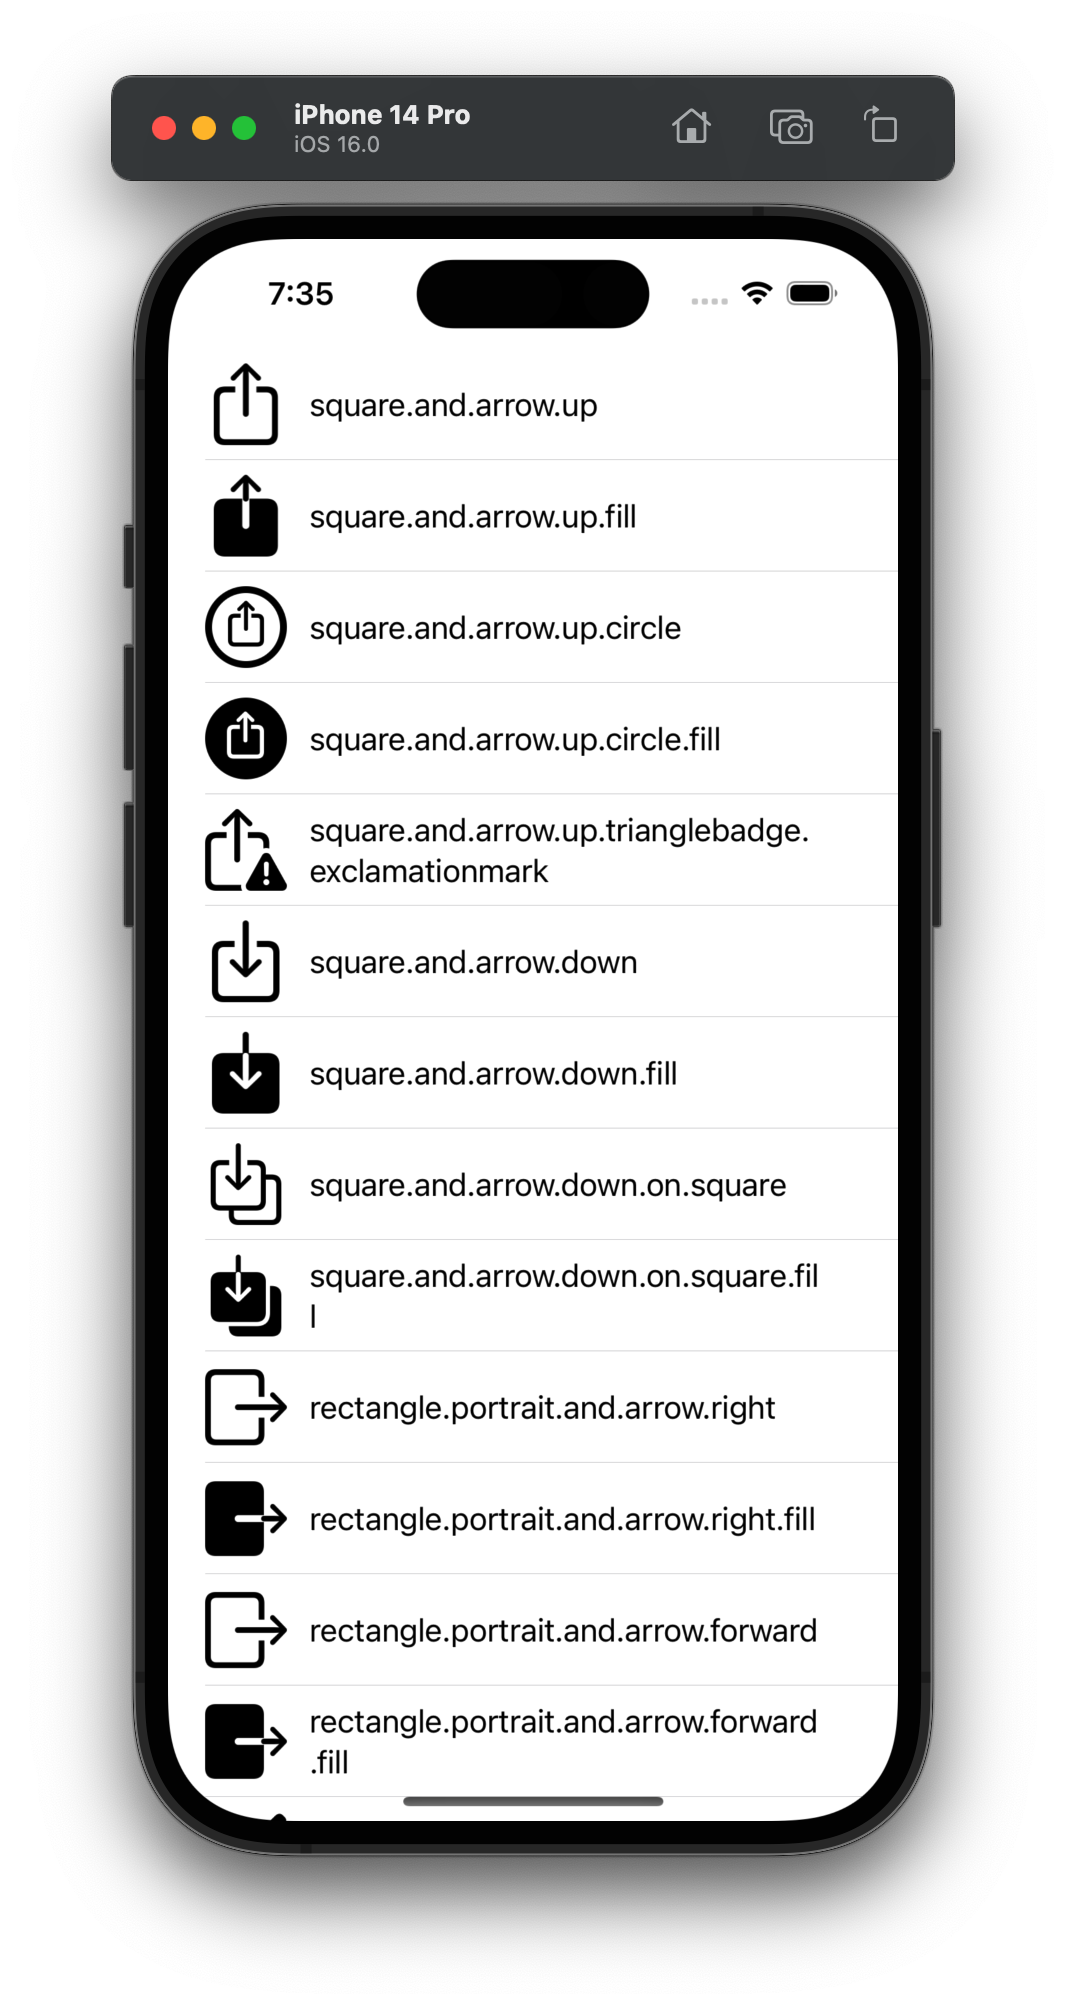
Updating
But what if you need to update the cell?
First move the creation of the content into it’s own function:
    @ViewBuilder static func createCellContent(symbolNameString: String, state: UICellConfigurationState) -> some View {
        HStack(spacing: 12.0) {
            Image(systemName: symbolNameString)
                .resizable()
                .scaledToFit()
                .frame(width: 44.0, height: 44.0)
                .foregroundColor(state.isSelected ? .red : .black)
            Text(symbolNameString)
                .font(.body)
                .foregroundColor(state.isSelected ? .red : .black)
            Spacer()
        }
    }
In the original function to load the model, you can utilize that both for the initial content configuration but also the cell’s configurationUpdateHandler. The result for the function that loads the model object looks like this:
    func load(symbolNameString: String, state: UICellConfigurationState) {
        self.contentConfiguration = UIHostingConfiguration(content: { SymbolCell.createCellContent(symbolNameString: symbolNameString, state: state)})

        self.configurationUpdateHandler = {(cell, updatedState) in
            cell.contentConfiguration = UIHostingConfiguration(content: { SymbolCell.createCellContent(symbolNameString: symbolNameString, state: updatedState) })
        }
    }
Now, when you tap on the cell, you can see a state change:
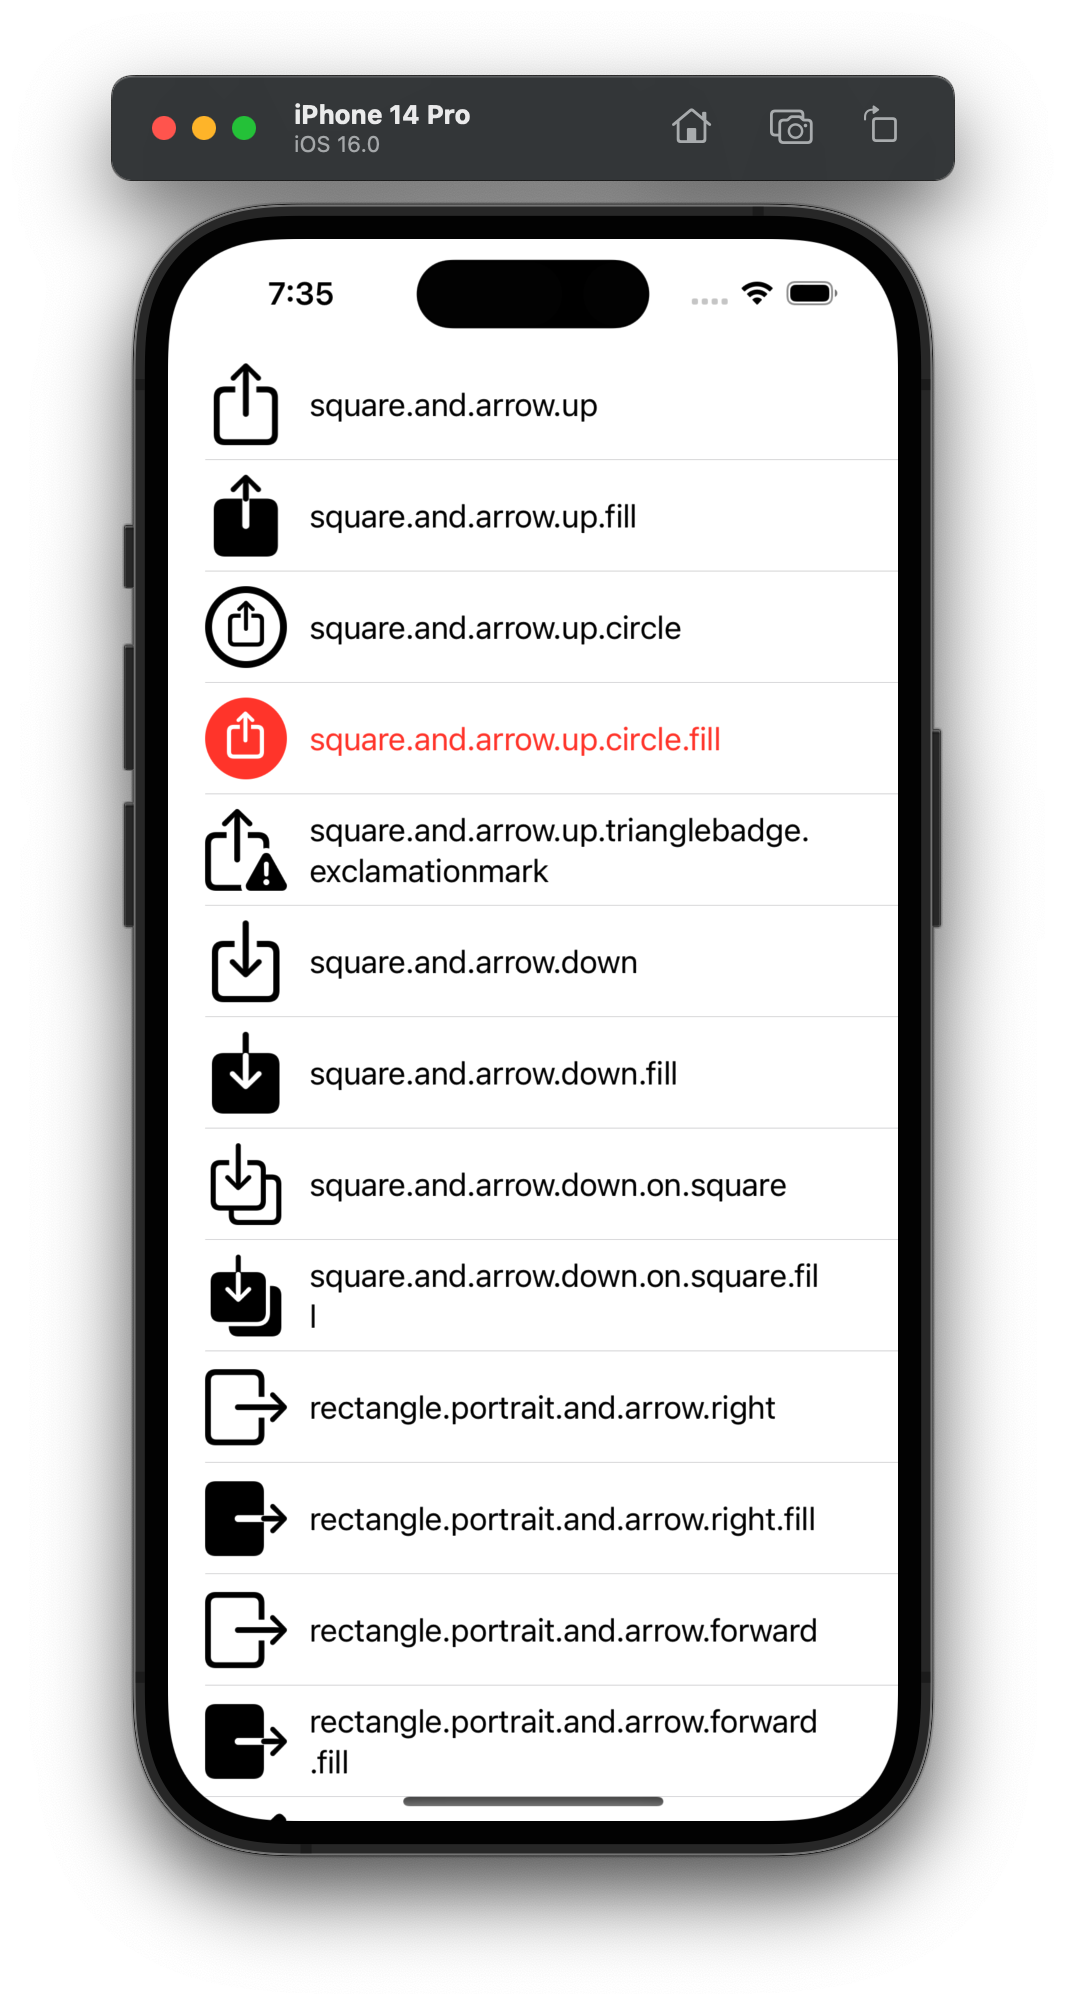
Hello World
I’ve been meaning to set this up for awhile as a way to remind myself of things I’ve learned.